![]()
Note: the '^' character represents the up arrow
symbol in Spectrum/Timex character set (Symbol Shift + H).
First Edition 1984
(C) T.O.S., Copyright TIMEX PORTUGAL Ltd.
TMX PORTUGAL Ltd. Apartado 2
2825 Monte da Caparica
TIMEX DISK OPERATING SYSTEM
------------------------------------------------------------------------------
CHAPTER - CONTENTS -
------------------------------------------------------------------------------
1 INTRODUCTION
------------------------------------------------------------------------------
1.1 Introducing TOS
1.2 About this manual
------------------------------------------------------------------------------
2 SETTING UP
------------------------------------------------------------------------------
2.1 Unpacking and Setting up
2.2 About the diskettes
2.3 Expanding the system
------------------------------------------------------------------------------
3 TOS - Part I
------------------------------------------------------------------------------
3.1 Using TOS commands
3.2 Getting started
3.3 CAT * - to catalogue disk contents
3.4 Filenames - what is in a filename
3.5 FORMAT *
3.6 LOAD * / SAVE *
3.7 Using LOAD * / SAVE *
3.8 MERGE *
3.9 TEMPLATES
3.10 ATTR *
3.11 ERASE *
3.12 LET *
3.13 MOVE *
3.14 Using MOVE * ERASE * LET *
3.15 START- to create start up files.
------------------------------------------------------------------------------
4 DIRECTORIES PATHNAMES - TOS Part II
------------------------------------------------------------------------------
4.1 The tree structure
4.2 TOS DIRECTORIES
4.3 The PATHNAME
4.4 Using TOS PATHNAMES
4.5 DIM *
4.6 GOTO * / ^ / : LIST *
4.7 GOSUB * / DRAW *
4.8 Using the Demo disk
4.9 ATTR * LET * MOVE * ERASE * LOAD * SAVE *
4.10 Using two or more drives.
------------------------------------------------------------------------------
5 RANDOM ACCESS and SEQUENTIAL FILES
------------------------------------------------------------------------------
5.1 Files
5.2 Channels
5.3 OPEN #*
5.4 LIST *#
5.5 RANDOM and SEQUENTIAL access files
5.6 RESTORE *
5.7 CLOSE #*
5.8 Fast and slow channels
------------------------------------------------------------------------------
6 SERIAL COMMUNICATION PORTS
------------------------------------------------------------------------------
6.1 The SCP's
6.2 FORMAT * a Serial Communication Port - configure
6.3 File transfer via Serial ports
6.4 OPEN #* and CLOSE #* commands with the SCP's
6.5 CLOSE #*
6.6 LIST *#
6.7 RESTORE *
------------------------------------------------------------------------------
APPENDICES
------------------------------------------------------------------------------
APPENDIX A - TOS COMMAND SUMMARY
APPENDIX B - ERROR REPORTS
APPENDIX C - UTILITY PROGRAMMES
APPENDIX D - RS232C LINK UPS
APPENDIX E - ERROR TRAPPING
APPENDIX F - MACHINE CODE TIPS
------------------------------------------------------------------------------
CHAPTER 1
------------------------------------------------------------------------------
INTRODUCING the TIMEX OPERATING SYSTEM (TOS)
------------------------------------------------------------------------------
The addition of disk drives to the SPECTRUM creates an immensely powerful system, and TOS
- the disk operating system especially developed by Timex - gives you the power from
within your BASIC programme that you have always wanted, but never believed would be
available.
The secret lies in the controller which, controls the operation of the disk drives, and it
is here that the TOS operating system resides. The controller is a separate computer
having its own Z8OA Central Processor, as well as its own internal memory and input/output
facilities. Every time a TOS command is issued it passes straight to the controller which
then executes the instruction, Placing no overhead on the SPECTRUM, and of course is not
dependent an any hardware limitations of the SPECTRUM, such as available memory.
The disks are the lastest in micro floppies, using very high density recording medium,
giving on the standard floppy 160K free an each side of the disk providing 320K of disk
space per drive.
The controller and TOS have been especially designed around the need to communicate. The
controller has two serial communication ports which can be be configured to suit almost
any type of protocol you are likely to need. This means that apart from being able to
communicate with TOS users, you will be set to 'talk' to other users, on a variety of
computers with a standard RS232C serial port. Other peripherals such as modems, printers,
plotters or any device that can be coupled to a serial port can also be connected to
these.
1.2 ABOUT THIS MANUAL
The manual has three separate sections.
The first contains enough information for you to set up and begin working with TOS.
The second goes through some of the more subtle ways of applying TOS in relation to the
use of tree directory structures, random access and sequential files, and concludes with a
chapter on the use of channels and serial communication ports.
The third part is a series of appendices for more specialised reference, and a quick
reference guide to TOS.
Information about the utility programmes included an your demo disk are explained in this
section.
------------------------------------------------------------------------------
CHAPTER 2
------------------------------------------------------------------------------
2.1 UNPACKING AND SETTING UP
------------------------------------------------------------------------------
Unpacking your system you will find: Disk drive unit
Controller
Power supply
Manual
Diskette
Set up the system as follows:
-Switch the power OFF to your SPECTRUM computer.
-Plug the interface into the rear edge-connector of the SPECTRUM.
-Connect the "D" plug of the controller to the interface.
-Connect the ribbon cable from the controller onto the disk drive.
There is a white mark on the ribbon plug witch should be pointing upwards, placing the red
edge of the cable on your left as you look at the socket. The plug at the end of the cable
must always be connected to drive A.
-Connect the power supply up as follows:
Check that the ON/OFF switch at the rear is off "0"
Plug the power leads into the disk drive and controller
Connect the mains plug
-Before turning on and inserting your diskette please read the section "about the
diskettes".
-If you are using more than one disk drive refer to the section following on
"Expanding the system".
If you are using a printer that normally plugs onto the SPECTRUM rear edge-connector you
will need to connect the optional "T" connector between your SPECTRUM and the
interface. The interface uses all the address lines on the port and needs to have more
lines than are available from plugging into the back of the normal printer connecting
plug.
If you are using a printer that has a standart RS232C interface, it may be connected to
one of the two serial communications ports on the controller. Such leads are avaiable from
Timex to plug into the controller in the relevant appendix of this manual.
------------------------------------------------------------------------------
2.2 ABOUT THE DISKETTES
------------------------------------------------------------------------------
The diskettes are made of a flexible mylar sheet coated with magnetic material, and are
onclosed in a plastic casing, which has a shutter to protect the recording media. This
shutter is automatically opened when the disk is inserted in the drive, and is the point
where the read/write head of the disk drive is positioned. The disks have two sides, and
are double density, and when used with this system have a formatted (meaning usable)
capacity of 160K per side, giving in all 320K per drive.
The disks are very reliable, but some basic precautions use must be taken:
-Do not expose the disks to heat or direct sunlight
-Keep away from strong magnetic fiels, e.g. transformers.
-Do not open the shutter or finger the magnetic surfacve
-Keep away dust that could reach the recording surface.
The disks can be write protected by using the small plastic tabs. You can protect either
side A or B or both by switching the two tabs on the disk. The creation of a hole by
moving the tab will write protect the revelant side of the disk. Where the tab blanks off
this hole the disk is not write protect.
------------------------------------------------------------------------------
2.3 EXPANDING THE SYSTEM
------------------------------------------------------------------------------
The basic configuration with a single disk drive can be upgraded to a total of four disk
drives: A,B,C,D. The first one is A and each additional drive is assigned a letter as far
as D.
Using more than two drives necessitates the use of a second power supply and a second
cable from the controller to the drives.
The initialisation of the disk drives from the factory is for use as A drive. You will
need to configure further disk drives yourself, as B, C, or D, depending on your system.
You do this as follows:
-Unscrew the 4 screws on the base of case which hold the drive assembly in position.
Remove the drive assembly from the case. The blue capped IC (integrated circuit) in a
socket near the edge-connector of the drive marked R1 is only needed in drive A, for other
drives it has to be removed. There is a jumper marked J01 which has to be connected
corresponding to the drive designation using the following values: A=0, B=1, C=2, D=3. As
you configure a new drive remember to label it with the drive letter an the front to the
drive for easy identification. From the outside of the drive you can check the designation
by looking into the rear edge connector. Under the word 'interface' You will see the small
connector in one of 4 Positions, the leftmost position corresponds to A, and the right
hand Pins for D.

Figure ..1.
If you are in doubt or difficulty contact your dealer.
------------------------------------------------------------------------------
CHAPTER 3
------------------------------------------------------------------------------
3.1 USING TOS COMMANDS
------------------------------------------------------------------------------
The way of accessing the TOS commands is familiar to those used to the SPECTRUM BASIC's
use of keywords. All the TOS commands use existing keywords, but they are followed by an
*(asterisk), so that LOAD becomes LOAD *.
TOS is a disk operating system: TOS commands are designed so that you can LOAD and SAVE
with the Disk Drives in a way similar to that of cassettes.
The beauty of TOS is that it does not interfere with the existing instructions relative to
the cassette, so that you are still free to use your cassette and disk drives at the same
time, and even from within the same programme. You need not change your existing
programmes when using TOS, but you will need to use LOAD * and SAVE * to transfer the
programmes to and from the disks (in much the same way you would for a cassette). The
syntax is essentially the same apart from the '*', which is there to activate TOS.
Instructions can either be executed directly from the keyboard or from within the
programme like any other BASIC instruction. TOS therefore becomes an extension of the
SPECTRUM BASIC, with all the disk and file handling facilities of TOS acting as extended
BASIC functions.
The next section deals with the TOS instructions. There are two ways instructions can be
executed: either directly from the keyboard (referred to as commands), or from within a
programme (referred to as statements). Throughout the manual - in relation to TOS - the
terms command and statement will be used in this context.
The term 'file' includes all types of programmes and data files, and no special
distinction is made unless applicable.
Knowledge of the SPECTRUM keyboard and SPECTRUM BASIC is assumed. Any doubts may be
clarified by referring to the SPECTRUM manuals
------------------------------------------------------------------------------
3.2 GETTING STARTED
------------------------------------------------------------------------------
The disk that comes with the system contains the demonstration programmes on side A and
side B has nothing on it. If you look at the disk you will see that side A has been write
protected using the plastic tab. Side B is not write protected, and is for you to use. The
only copy of TOS you have is on side A, so make sure that the disk remains write
protected. Side B will have to be formatted to be used, and is explained in section 3.4.
With the system set up you can now switch on the current using the power switch on the
back of the power supply in the '1' Position.
Insert the disk labelled TOS in the drive and the system will 'BOOT'. The red light on the
drive will flicker until finally it goes off. TOS is then ready for use. There is the
controller reset button, which resets the whole system or the reset button on the
interface, to reset the SPECTRUM.
When you reset the controller TOS will be 'BOOTED'. There will not be the normal message
an the screen that appears when you turn on the SPECTRUM by itself when not using TOS.
There is a special kind of boot, described in section 3.15 that allows the automatic
execution of a start up programme on your SPECTRUM.
CAUTION Do not power up the system with the disk inserted in the drive. It you stock the
system, the power supply should be on the top Never prevent air circulation to the power
supply.
------------------------------------------------------------------------------
3.3 CAT * - catalogue disk directory contents
------------------------------------------------------------------------------
Unless a cassette is labelled properly there is no way of knowing what programmes it
contains without loading the programmes into the computer. TOS has a special directory of
each file on the disk, together with information about where it is located on the disk,
the size of the file, and other information, some of which is useful only to the operating
system, but some of which is displayed as part of the listing appearing on the screen as a
result of executing the CAT * instruction.
Using side A of your demo disk type in the command: (Side A is accessed by placing the
disk into the drive door with side A facing upwards)
CAT * followed by enter
A listing of the disk directory contents will appear. Notice that you can stop the
SCROLLING at any time using the S key and resume using the Q key. Try it. This is common
to many TOS commands.
:DEMO
Level 0 Drive A
Name Typ Size Alloc S P
-------------------------------
HELP BAS 11087 11K P
MATHS DIR 3187 4K P
FUN DIR 6651 9K
P
UTIL DIR 3075 7K P
FILING DIR 1070 2K P
MAX 140K CUR 33K REM 107K
0 OK, O:1
------------------------------------------------------------------------------
3.4 FILENAMES - what is in a filename
------------------------------------------------------------------------------
Referring the directory output from the CAT * instruction of the previous page, you will
see the columns contain the filename, the extension (type) of file, the file size in
bytes, the disk allocation and finally two columns headed S and P, these are to indicate
it the file is currently open, and if it is write protected.
The filename is a string of up to 8 characters, optionally followed by another string of
up to 3 characters to indicate the file type. The filename and the extension must be
separated by a .(dot). TOS treats the filename as a BASIC string and therefore it must be
surrounded by matching quotes. It is possible to use symbols as well as digits and
characters, although the symbol must be a single character not >= or keywords. The
following symbols are used by TOS and must not be used: ".", "^",
"?", "+".
TOS will automatically convert any file name to the upper case equivalent
examples:
"HELP.BAS" equivalent to: "hElp.Bas" or
"help.bas"
"UTILITY.DIR"
The file type is useful for reference, the only extensions that have special meaning to
TOS are the DIR and SCP extensions, used to identify the name of a directory or a
communication channel.
TOS stores files in directories, but also allows a directory to be stored within another
directory. The route to a file or the pathname, may be just the name of the file, but can
include the name of the directories on the route to the file. Being able to specify
pathnames in this way is a very powerful feature of TOS, and a chapter of the manual is
devoted to it.
The size of the file is the number of bytes the programme will use in RAM (Random Access
Memory) of the SPECTRUM plus 5 or 7 bytes for use of the system.
The disk is divided into tracks, which are in turn divided into sectors. These tracks and
sectors are termed 'soft sectored', because they are written to the disk by software. This
process of placing these tracks and sectors on the disk is called Formatting, and must be
done before the disk can be used.
The disk allocation of a file relates to the number of sectors used. TOS allocates always
a minimum of 1KB(1024 bytes) to a file.
The last two columns headed S & P indicate whether the file is open, and whether or
not it is write protected.
Open meaning, that the file is currently open to be accessed from a programme. The P
indicates that a file is write protected, this refers to the software facility within TOS,
not the setting of the plastic tab or. the casing of the disk.
------------------------------------------------------------------------------
3.5 FORMAT * - prepare new disk to operate under TOS
------------------------------------------------------------------------------
Any disk has to have the sectors and tracks recorded onto it before it is used, most
systems have other information placed on the disk as well. The way TOS operates is by
being written itself to each side of a disk.
When the system is 'booted' up TOS is there and is transferred into the controllers
memory.
This Process of preparing the disks for use in this way is called FORMATTING.
The syntax is:
FORMAT *"drive name" TO "disk name"
CAUTION: FORMAT * DESTROYS ALL OF THE DISK CONTENTS !
The only way to prevent a disk from being FORMATTED is to use the protection tabs on the
disk .
This is the only TOS instruction where the Drive name, and disk name must be specified.
The names of the four drives are A,B,C,D. Where only one drive exists it must be drive A.
The demonstration disk side A has all the demonstration programmes and the operating
system TOS on the disk on side A. CAT *, the directory command, will show that there are
files there. Side B is not FORMATTED, so will need doing straight away.
Side B is accessed by placing the disk into the drive door with side B facing upwards.
RESET : On the controller to reset TOS
Remark: Red light of disk A flashes on for a while then stops
Remark: The sign that TOS is being read from the disk, all o.k.
Remark: Turn disk over to side B
Enter : CAT *
Remark: Disk keeps spinning, but stops with error report
Remark: Error report: Hardware fault on disk DEMO
Remark: This occurs because the disk is not FORMATTED
The disk must have a name to be used for the FORMAT *, let it be Test. Follow the
instructions to see how it is done.
Remark: turn disk over to side A
Remark: FORMAT * will clear all data from a disk, be careful
Enter : FORMAT *"A" TO "test"
Remark: TOS responds: Format disk in drive A (Y/N) ?
Enter : Y
Remark: Change disk and press ENTER
Remark: turn to side B
Enter : ENTER
Remark: This allows formatting with a one disk system
Remark: It takes about 30 secs to format
Remark: It stops through 40 tracks and then writes TOS across.
The system is written to the disk and uses up 16K of space on the disk. There is another
4k used by the directory for the disk. You can notice that the system is written to the
disk last and takes place while the light is flickering at the very end.
To format the disk B the principle is exactly the same, except the drive name is disk B.
If the disk name was 'NEWDRIVE', then the command would appear like this!
FORMAT *"B" TO "NEWDRIVE"
In this case there must be a system disk in drive A for the system to work, and there
would be no delay for disk change, which is there to allow the change of disk needed to
format a disk in a single drive system.
------------------------------------------------------------------------------
3.6 LOAD * / SAVE * - transfer between disk and RAM (memory)
------------------------------------------------------------------------------
LOAD * and SAVE * are similar to the standard LOAD and SAVE instructions of the SPECTRUM,
except that a name must be specificied, and TOS treats all characters as upper case. LOAD
*"" will produce an error report.
The LOAD "" of the SPECTRUM is useful when the name of the programme is not
known. In TOS the CAT * command displays the directory of the files on the disk, making is
easy to find the programme needed.
The same options of LINE, CODE, SCREEN$ and DATA exist
The syntax for SAVE * and LOAD * is the following:
SAVE * pathname LOAD-OPTION [n]
LOAD * pathname LOAD-OPTION
When the path in SAVE *refers to an existing file TOS prompts:
<> already exists
Supersede (Y/N) ?
A "Y" will overwrite the file <> whilst "N" will ignore the
command. If the [n] option is used then TOS will carry out the command without prompting.
The OPTIONS are:
SAVE * pathname LINE number
-save with auto run
LOAD * / SAVE * pathname SCREEN$
-save a screen
LOAD * / SAVE * pathname CODE start,length -save machine code
LOAD * / SAVE * pathname DATA array name () -save string array or numeric array
Try the following:
Remark: Using the demonstration disk in drive A SIDE A
Enter : CAT *
Remark: All the files in the directory displayed.
Enter : LOAD *"HELP.BAS"
Remark: The optional typ is separated by a .(dot)
Remark: To stop a programme use BREAK- [capshift space]
Enter : Press ENTER and then LIST
Remark: The programme listing appears on the screen.
Example Programme to generate a screen:
(linked to the exercise following)
10 REM TOS.BAS
20 PAPER 3
30 FOR I=1 TO 704
40 PRINT "$"
50 NEXT I
60 PAPER 6
70 PRINT AT 5,13;" TOS "
80 PRINT AT 13,12;" TIMEX "
90 PRINT AT 15,7;" OPERATING SYSTEM "
100 STOP
------------------------------------------------------------------------------
3.7 USING LOAD * / SAVE *
------------------------------------------------------------------------------
Using side B of your demonstration disk:
Enter : SAVE *"tos.bas" LINE 10
RESET : Using the reset button on the interface.
Enter : CAT *
Remark: The programme TOS.BAS should now be in the directory.
Remark: The SPECTRUM memory is clear.
Enter : LOAD *"TOS.BAS"
Remark: The Programme automatically runs.
Remark: The programme was saved using lower case.
Enter : SAVE *"TOS.SCR" SCREEN$
Remark: The screen memory image is saved as bytes in memory.
Remark: CAT * will confirm the screen has been saved.
RESET : Using the reset button on the interface.
Enter : LOAD *"TOS.SCR" SCREEN$
Remark: The screen memory address 16384, with 6912 bytes loaded.
Enter : SAVE *"TOS.COD" CODE 16384,6912
Remark: Save option of CODE start address,length
RESET : on interface
Enter : LOAD *"TOS.COD" CODE 16384,6912
Remark: Exactly equivalent to load with screen$-now you know why
Enter : CAT *
Remark: New screen !
Enter : SAVE *"TOS.SCR" SCREEN$
Remark: TOS prompts You.(answer no)
Enter : SAVE *"TOS.SCR" SCREEN$ n
Remark: No prompting ! "TOS.SCR" is overwritten.
The use of Arrays in BASIC is the main way of creating Data storage. TOS provides
additional file handling capabilities in sequential and random access files. Data can
still be saved in arrays using TOS.
The syntax for a string array named p$ which is to be saved as the date file 'name.dat'
is:
SAVE *"name.dat" DATA P$() to load: LOAD *"name.dat" DATA p$()
Were the array numeric the syntax would only differ in the name for the array which would
have no '$' after it.
Using the file type to indicate the type of data in the file, the right Load-option can
more easily be chosen, avoiding the likelyhood of data type mismatch. E.g. a SCREEN$ type
cannot be loaded using LOAD *'filename'.
------------------------------------------------------------------------------
3.8 MERGE * - merge one programme on another
------------------------------------------------------------------------------
The syntax is MERGE * pathname
This merges a new programme and its variables, specified by the pathname with the old
programme in the SPECTRUM memory.
The new file must contain a BASIC programme and overwrites any of the programme lines or
variables in the old programme with line numbers that conflict with the ones of the new
programme. It is not possible to merge bytes or arrays .
RESET : On the interface
Remark: Use side B of Demo disk
Type : 40 PRINT "#";
Enter : SAVE * "TOS.OVL"
Enter : CAT *
Remark: Programme 'TOS.BAS' and 'TOS.OVL' are on disk
Remark: Going to overlay TOS.OVL onto TOS.BAS
Enter : LOAD *"TOS.BAS"
Enter : MERGE *"TOS.OVL"
Enter : Press ENTER
Remark: Line 40 is changed by the MERGE *
Enter : RUN
------------------------------------------------------------------------------
3.9 TEMPLATES - masks for any name / character
------------------------------------------------------------------------------
A template is similar to the 'Joker' in a pack of cards, because it can be anything. A
template will allow a selection over a number of files, by for example selecting all those
beginning with a particular character, or all those with a BAS type extension.
There are two templates characters or wildcards in TOS as follows:
+ (plus) replaces all the name, or type
? (question mark) replaces a character
A pathname with at least one of these characters is called a TEMPLATE
Selection of files could be done like this:
"+.+" -name and type masked
"+.BAS" -any name with BAS type
"+" -any file with no type
"C???????.+" -any 8 letter file starting with C
"C+" -File starting with C and
no type
Templates are very useful for checking directories using CAT * to find a particular type
or group of files. They can be used with the following instructions:
CAT * / LET * / ATTR * / MOVE * / ERASE *
Instructions needing a specific argument such as GO TO * cannot use TEMPLATES. Go to
anywhere is meaningless!
------------------------------------------------------------------------------
3.10 ATTR * - protect / unprotect file
------------------------------------------------------------------------------
The ATTR * instruction sets the file attribute to 'protected' or 'unprotected' and to
'visible' or 'invisible' as required.
The syntax is:
ATTR * pathname p -to Protect a file
ATTR * pathname u -to Unprotect a file
ATTR * pathname i -to Hide a file
ATTR * pathname v -to Unveil a file
Templates are allowed to lock or unlock ranges of files. This protection is useful to
prevent inadvertent erasure or altering of a file.
Files that are made invisible with this command will not be displayed when a CAT * is
executed. 'Visibility' can be retrieved by using the ATTR * pathname v command.
Try the following:
Remark: use side B of the demo disk
Enter : CAT *
Remark: last col of directory is protect state
Remark: Programme 'TOS.OVL' is on the disk.
Enter : ATTR *"TOS.OVL"P
Remark: P does not appear in protect column straight away.
Enter : CAT *
Remark: Now the P appears showing the file is protected.
Enter : ATTR *"+.+"U
Remark: Unprotects all files
Enter : CAT *
Remark: All files are now unprotected nothing in last column.
Enter : ATTR *"+.+"p
Remark: All files are now Protected an side B of Demo disk.
Enter : ATTR *"+.+"i
Enter : CAT *
Remark: No files displayed by the CAT * command
Enter : ATTR *"+.+"v
Enter : CAT *
Remark: All files visible once more
------------------------------------------------------------------------------
3.11 ERASE * - erase file
------------------------------------------------------------------------------
When files are no longer needed the best thing to do is delete them the instruction for
this in TOS is ERASE *.
The syntax is:
ERASE * pathname [n]
Templates can be used. ERASE * will not delete a protected file. TOS prompts you with the
following response before taking action unless the [n] parameter is given, then it will be
carried out without TOS asking, no prompt:
Erase < > Y/N ? (< > represents the file name)
Y will execute the command
N will stop the file from being erased
------------------------------------------------------------------------------
3.12 LET * - change name
------------------------------------------------------------------------------
This instruction to rename a file in TOS is: LET *
The syntax is:
LET * old Pathname TO new-pathname
TO is a keyword, and cannot be the characters TO separately.
Protected files can be renamed, where the protection is at the file level with the
software. If the directory has been write protected, renaming would still be possible.
However if the disk has been software write protected TOS will prevent renaming. Setting
the hardware protection tab also prevents name changes.
TOS gives on error message explaining the protection level.
Trying to rename an open file or using templates will generate error messages from TOS.
------------------------------------------------------------------------------
3.13 MOVE * - copy source to destination
------------------------------------------------------------------------------
Creating copies of disks and programmes is an essential part of using a disk system.
Important work, and programmes should be backed up.
If you are using a single disk system, you will need to use the utility programme, which
is on your demo disk in order to create a copy of an entire disk. Details are in the
appendix - Utility programmes.
A disk copy may be made where there are two drives by using the copy command and
specifiying the target directory, into which the files are to be copied. This is dealt
with in section covering directories in CHAPTER 4
The syntax is:
MOVE * source-name TO destination-name
Try the following:
------------------------------------------------------------------------------
3.14 USING - MOVE * / ERASE * / LET *
------------------------------------------------------------------------------
Remark: Using side B of the demo disk.
RESET : on the interface
Enter : CAT *
Remark: P in the last column indicates file is protected
Remark: Can a protected file be renamed?
Enter : LET *"tos.ovl" TO "renamed"
Remark: No obvious change - directory needs refreshing
Enter : CAT *
Remark: The name is now RENAMED with no type
Remark: The file is still protected with the name change
Enter : MOVE *"renamed" TO "tos.ovl"
Enter : CAT *
Remark: Now the original copied from the renamed is back
Remark: copying creates a duplicate of the file
Enter : ERASE *"renamed"
Remark: protected files cannot be erased
Enter : ATTR *"renamed"u
Remark: Unprotect the file
Enter : ERASE *"renamed"
Enter : CAT *
Remark: That did it
Enter : ATTR *"+.+"p
Enter : ERASE *"+.+"
Remark: TOS lists all the protected files not erasable
Enter : ATTR *"+.+"u
Enter : ERASE *"+.+"n
Remark: TOS erases all files without Prompt of Y/N
Remark: The Demo disk side B - all programmes erased
------------------------------------------------------------------------------
3.15 Start - creating start up files.
------------------------------------------------------------------------------
TOS allows you to create a start up file which is automatically loaded into your SPECTRUM
and run every time you reset it (power up or RESET button on the interface).
To use this feature you must SAVE * your start up Programme with the auto run facility and
call it 'START'. Now every time a reset is executed TOS will look for, a Programme named
'Start' in drive A if it exists then the SPECTRUM will run it.
Remark: To be able save the programme displace the disk protection tab.
Enter : Using side A of your diskette
Enter : 10 LOAD *"HELP.PAS"
Remark: SAVE *"start" LINE 10
Enter : Creating a programme named 'START'
Reset : CAT *
Remark: Using reset button an interface.
Remark: Help.bas runs automatically.
If you have a programme named 'START' and you want to temporarly avoid its execution use
BREAK while pressing the reset button on the interface. If you don't wish to use it at all
simply erase it.
Try the following 'START' programme:
10 CAT *
20 INPUT "Name of file to LOAD ? ";a$
30 LOAD *a$
------------------------------------------------------------------------------
CHAPTER 4
------------------------------------------------------------------------------
4.1 TREE STRUCTURE
------------------------------------------------------------------------------
A Tree structure has a stem linked directly to the root. There are branches which are
directly linked to the root, but there are branches which grow out of other branches, and
so on.
The path from a leaf to the root, may involve passing through several branches, on the way
to the root.
The path may be very complex if the branch that the leaf is connected to is itself
connected to other branches, but may also be very simple if there is a direct connection
to the root via the stem.
The directory structure of TOS is analogous to the tree structure:
- There is a root directory which contains other directories.
- A directory may contain files and /or directories.
- Directories can be nested one within another.
- From any directory to a file (or directory) there is a specific route called, the
PATHNAME
- A PATHNAME is a specified route of moves from a source directory through the tree
structure to a file together with the filename.
- The PATHNAME can be the filename itself, when the file is within the source directory
and no move is needed to reach it.
Note: Source directory does not mean root directory, but any directory which is the source
of the path, in the PATHNAME.
The advantage of being able to name directories in this way means that the possiblity
exists for grouping information or programmes into convenient divisions. When many files
exist on a disk it is only necessary to CAT * that directory containing the file, thus
avoiding the need to have several screens of files displayed.
Grouping file types under one directory, will make accessing them easier. For example if
the BASIC programmes are in one directory and the machine language programmes are in
another, then accessing and using the programmes is easier and leaves less chance of
errors trying to LOAD * a programme with the wrong Load-Option. Including the extension
type, whether BAS to represent BASIC or .COD to represent CODE or whichever extension is
convenient to identify the file type, is useful, especially when large numbers of files
are on the disk.
------------------------------------------------------------------------------
4.2 Introducing TOS with DIRECTORIES
------------------------------------------------------------------------------
It is important to identify the difference between the directory and the file. The
directory contains the reference to where the file is rather like an index to a book does.
TOS is organised in a hierarchic structure meaning that it is possible to have files and
/or directories inside directories. The directories appearing just like any other files
inside a directory, but they always have a DIR type extension to the name.
There are two special files with the extension SCP, these are serial communication ports,
and are: CH_A.SCP and CH_B.SCP, these may also appear in the directory listing and are
dealt with in the last chapter.
The structure of your system with the demonstration disk is, shown below:
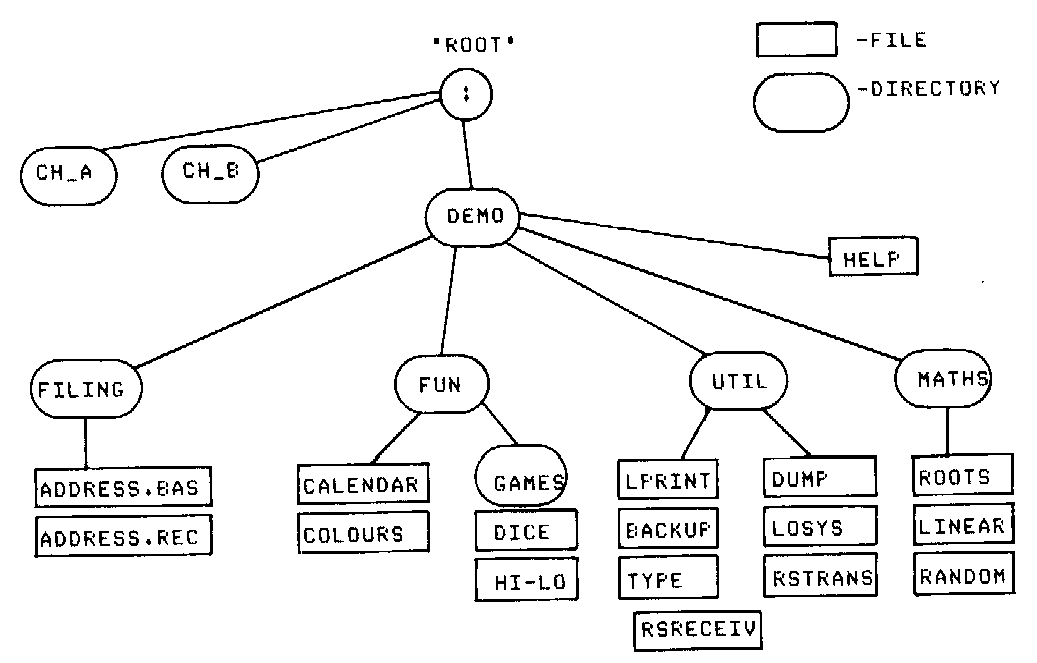
Figure ..2.
TOS Provides various ways of moving around the directory structure as well as methods of
creating, erasing, protecting, copying, and renaming a directory.
------------------------------------------------------------------------------
4.3 THE PATHNAME
------------------------------------------------------------------------------
The TOS use of PATHNAME allows access to any file on whichever disk, or directory that it
is in.
The directory which is the one that TOS is currently at, is termed the default or current
directory. When a command like CAT * is performed it uses as its argument the current
directory name, and produces the listing of that directory.
The tree structure that TOS uses should be considered as an inverted tree, with the root
at the top, and the branches coming down. This is so that moving 'up' the tree, involves
moving back upwards to the root. Moving down involves moving through named directories
towards the lower branches. Moving downwards the branches, provide alternative routes.
This is why TOS will insist or, having directory names specified on the way down, but will
accept '^' (an up arrow) as an instruction to move up, because on the way up there is only
one way to go.
------------------------------------------------------------------------------
4.4 Using TOS PATHNAMES
------------------------------------------------------------------------------
TOS can use pathnames in the majority of the instructions such as LOAD *, SAVE *, MERGE *
CAT *, ERASE *, MOVE *, ATTR *, DIM *, LET *. These instructions function in much the same
way as they would using a filename, but have the additional options available through the
added ability to work through the pathname, and so operate across the boundary of the
directory.
There are several points to note about pathnames as follows:
-The pathname is a compound name, defining a path from the current directory to a file (or
a directory).
-Directory names on the path must be separated by a colon (:).
-The root directory may be represented by a colon (:).
-Any pathname can be defined from the root directory by starting the pathname with a
colon.
-Any pathname not starting with a colon will be from the current directory.
-The Pathname is treated as a BASIC string and is within quotation mark, and can be
represented by string variables.
Referring to figure 2 of the directory structure in the demo disk, the pathname can be
studied in relation to the following examples:
FILE -------------------- PATHNAME --------------
Calendar.bas ":DEMO:FUN:CALENDAR.BAS"
Hi-lo.bas
":DEMO:FUN:GAMES:HI-LO.BAS"
Roots.bas
":DEMO:MATHS:ROOTS.BAS"
The pathname consists of a 'Path' through the directories together with a target
'filename'. TOS helps you to know where you are by printing cut the 'path' to the current
directory at the head of the directory listing. How ever far down a directory tree you go
this information is always in the directory, together with the level of nesting of GO SUB
* level of the directory.
------------------------------------------------------------------------------
4.5 DIM *
------------------------------------------------------------------------------
There are times that it is necessary to create files that are not for storing programmes
or screens, but some other kind of information. The DIM * instruction is provided by TOS
for this purpose.
The svntax is:
DIM * pathname
DIM * creates a file or a directory. The use of the path means that files can be created
outside the current directory.
To create a directory the DIR extension must be included, letting TOS know it is a
directory, otherwise a file would be created.
Using DIM * it is possible to create up to 16 directories an each side of the disk, that
includes the directory corresponding to the disk itself. This means 15 now ones can be
created, the structure is entirely up to the user. Attempting to create more then 15 will
generate the error report: cannot create more directories.
Directories may be nested withing each other or directly under the disk's main directory,
at the same level.
DIM * cannot be used to create an SCP (Serial Communication Port). Trying to do so would
product an error report of wrong type.
DIM * cannot be used to create a file that already exists.
It a file 'newfile' exists then DIM *"newfile" would generate the error: NEWFILE
already exists.
A similar conflict would occur trying to DIM *"newdir.dir" that already existed.
Creating a file of the same name as a directory is not allowed.
Attempting to open a file "newdir", without any type extension would still
produce the error: NEWDIR already exists.
The pathname can be a string variable, and the DIM * instruction used as a programme
statement as in the following example:
Two directories are opened using a direct command as follows:
DIM *"NEWDIR.DIR":DIM *"NEWDIR:DIR1.DIR"
10 REM Create files
20 LET a$=""
30 FOR i=1 TO 8
40 LET a$=a$+STR$ i
50 DIM *"newdir:dir1:"+a$
60 NEXT i
Remark: Use side B of disk, SAVE * the above programme
Enter : SAVE *"CREATE"
Enter : RUN
Enter : CAT *"newdir:dir1"
Remark: In directory "dir1" are:1, 12, 123, 1234,......,12345678
Remark: All the files are created with size zero
------------------------------------------------------------------------------
4.6 GO TO * / ^ / : / LIST *
------------------------------------------------------------------------------
The default directory can be changed to another directory by usin the GO TO * instruction.
The syntax is:
GO TO * Pathname
A special instruction exists to move up through the directory structure which is;
GO TO *"^" -move up one directory level
GO TO *"^^" -move up two directory levels
Any number of levels can be moved up in this way, but there is a short form of returning
to the top (the root) which uses a colon and is as follows:
GO TO *":" -goes to the root directory
The Place you are in TOS is always stated at the top of the directory. TOS allows that
information to be displayed by itself using the LIST * command, along with your directory
location.
GO TO * and LIST * may be used as a programme statements.
The pathname may be a string variable.
Remark: Using side A of your demo disk.
Enter : CAT *":"
Remark: The physical resources of your system are displayed starting with the name of the
disk In drive A followed by the two SCP's.
Remark: Another way to display the root is,
Enter : GO TO *":"
Enter : CAT *
Remark: Suppose You just wanted to know the size of the file 'HI-LO.BAS'
Enter : CAT *"DEMO:FUN:GAMES:HI-LO.BAS"
Enter : CAT *
Remark: Your current directory is still the same.
Remark: If you wanted to make 'GAMES' current directory
Enter : GO TO *"DEMO:FUN:GAMES"
Remark: To know information about "HI-LO"
Enter : CAT *"HI-LO.BAS"
TOS allows you to change your current directory to another drive without knowing the disk
name. The syntax is:
GO TO *"DRIVE NAME"d
Where the 'DRIVE NAME' can be A, B, C, or D. Specifiyng a pathname is not allowed when
using this facility. Refer to Section 4.9
------------------------------------------------------------------------------
4.7 GO SUB * / DRAW *
------------------------------------------------------------------------------
It is very useful to go to a directory perform whatever instructions are needed and return
back to the source directory.
TOS allows this using the GOSUB * instruction followed by the DRAW * instruction. The
process is very similar to a subroutine call in BASIC. TOS uses a directory stack, which
holds information on the level of nesting of these calls. TOS allows 8 levels of nesting
of subroutine calls to directories in this way.
The syntax is:
GO SUB * [pathname]
The pathname between brackets means that it is optional.
GO SUB * is used in conjunction with DRAW * which causes a jump back to the original
directory. The level of GO SUB * nesting is displayed at the head of the directory listing
produced by CAT *.
It does not matter which directory is current it will always be level 0, unless a GO SUB *
has been executed. The level refers to the level of nesting on the stack. Every time a
DRAW a is executed, the level drops by 1. An error will result from trying to DRAW * from
level 0: cannot return from level 0.
The advantage of using GO SUB a instead of the straight GO TO a instruction is that TOS
automatically keeps track of your route and will DRAW * you to where you started, and the
way back requires no argument, just DRAW *. GO TO * would require the path specified for
the route back. You can also use '^' to move up levels of directories.
LIST * displays the contents of the directory stack, hence for all the levels the
following information:
PATHNAME, LEVEL, and DRIVE ()
Remark: Using side A of your demo diskette
Remark: You want to save your current directory in the stack for later use but you want to
remain in that directory.
Enter : GO TO *":DEMO:FUN" or GO TO *"DEMO:FUN" it you are still at
the 'ROOT'
Remark: Makes 'FUN' your current directory
Enter : LIST *
Enter : GO SUB *
Remark: No pathname. Current directory saved an stack.
Enter : LIST *
Remark: The current directory is the some but the directory level has been incremented.
Enter : GO TO *":DEMO:MATHS"
Enter : CAT *
Enter : DRAW *
Enter : LIST *
Remark: You got bock to your first directory.
Like with the GO TO * command this instruction also permits the usage of the d Parameter
(GO SUB *"drivename"d) which will enable you to change drives without specifying
the disk name.
------------------------------------------------------------------------------
4.8 DEMO DISK
------------------------------------------------------------------------------
The Demo disk contains programmes on side A that should be used for the following study of
the directory structure.
The pathname making use of nested directories will be used, together with the proceeding
set of instructions.
Remarks on how compound pathnames differ from pathnames with no 'path' in relation to the
instructions introduced in chapter 3 will be dealt with at the end of the next section.
Try the following:
Remark: Using side A of the Demo disk
Enter : GO TO *":"
Remark: go to the root directory
Enter : CAT *
Remark: DEMO.DIR
Remark: CH_A.SCP
Remark: CH_B.SCP
Enter : GO SUB *"DEMO"
Remark: Going down the tree, but can easily returns
Enter : LIST *
Remark: Tells us where we are
Enter : CAT *
Remark: See what is available:
Remark: Help.bas only Programme, rest are directories
Enter : LOAD *":DEMO:HELP.BAS" or simply LOAD *"help.bas"
Remark: using a compound pathname in LOAD *
Remark: Running help, you find it is a TOS summary
Remark: A programme can be stopped using BREAK
Enter : CAT *
Remark: using LOAD * did not change the LEVEL from 1
Enter : GOSUB *"FUN"
Enter : CAT *
Remark: level 2, & pathname on top of directory
Remark: What about a game!
Enter : GOSUB *"GAMES"
Enter : CAT *
Remark: play dice!
Enter : LOAD *"DICE.BAS"
Remark: When wou have had enough BREAK {CAPSHIFT SPACE}
Remark: How to go and got help again
Enter : LOAD *":DEMO:HELP.BAS"
Remark: After finishing see where we are
Enter : CAT * or LIST *
Remark: We did not move from the current directory
Enter : DRAW * followed by LIST *
Remark: each DRAW * moves down 1 level
Enter : Using GO TO *"^^" or : would got back to root
Remark: use GO TO * instead of GO SUB * doing it again
------------------------------------------------------------------------------
4.9 ATTR * / LET * / MOVE * / ERASE * / LOAD * / SAVE *
------------------------------------------------------------------------------
The way these commands operate with files, is similar to the way they operate using
directories, however there are differences, based on the fact that a directory can contain
a file. This means that operating on a directory will affect the file. Some instructions
cannot be used in the same way with directories.
ATTR *: can be used to protect, unprotect, veil or unveil directories in a similar way
that it can be used with files. As an example;
ATTR *"Newdir:dir1:+.+"v
Will unprotect all the files in 'dir1'
LET *: Directories can be renamed just like files, but only when there are not any files
currently open. As an example:
LET *":Disk1" TO ":Work"
will rename directory 'Disk1' to 'Work'.
MOVE *: The copying function cannot be used to copy a directory. However the files from
within can be copied freely from one directory to another. A utility backup programme
exists which will perform the function of a disk Copy When needed. This programme is on
the disk that you received with TOS, and its functioning is explained in the appendix C.
A file can be copied from one directory to another like this:
MOVE *"create" TO "newdir:create"
MOVE * can also be used with SCP's, copying to then and from them just like other files.
You can even copy from one SCP to the other, which could be useful for echoing the input
from CH_A to CH_B could be used in testing a device equipped with an RS232C interface,
like a video terminal or other computer.
MOVE *":CH_A" TO ":CH_B"
A File can be 'sent' to an SCP using MOVE * as follows:
MOVE *"Tos.bas" TO ":ch_b"
CAT *: Can be used simply by adding the full pathname as follows:
CAT *"newdir:dir1" to list all the files on "dir1"
ERASE * can be used in much the same way as with files, except you cannot erase the names
defined in the root, like the actual name of the disk and the SCP's. Erasing a directory
will erase all the files within it, but if a directory contains another directory it
cannot be erased. All files have to be closed before a directory can be erased, or indeed
even a file that is open cannot be erased. If there are files within a directory that are
write protected, then the directory cannot be erased until they have been unprotected. You
can ERASE * unprotected files inside protected directories.
There is an option using ERASE * that allows files to be erased without offering the Y/N
prompt that is normal. This is using the n option, which works like this:
ERASE *"+.+"n -no prompting
ERASE *"+.+" -will give Y/N choice for each file
LOAD * / SAVE * can be used in exactly the same way as with a single file except including
the full pathname. This way you are able to save or load programmes from any of the
directories in the system, from the current directory.
SAVE *":NEWDIR:DIR1:CREATE" -saves the programme in dir1
LOAD *":NEWDIR:DIR1:CREATE" -to load it
Try the following:
Remark: Using disk B. With the program 'CREATE' we generated 8 files with numeric names in
section 4.5
Enter : ERASE *"NEWDIR"
Remark: Can not ERASE * a directory that contains directories.
Enter : GO TO *"NEWDIR"
Enter : CAT *"DIR1"
Remark: Create another directory and copy all files into it
Enter : DIM *"DIR2.DIR"
Enter : MOVE *"DIR1:+.+" TO "DIR2"
Enter : CAT *"DIR2"
Remark: All the files in dir1 copied to dir2
Remark: Protect/ unprotect dir1 and files then erase them!
Enter : ATTR *"DIR1"P
Enter : ATTR *"DIR1:+.+"P
Enter : CAT *: CAT *"DIR1"
Enter : ERASE *"DIR1"
Enter : ATTR *"DIR1"U
Remark: The directory is unprotected, but files are Protected
Enter : ERASE *"DIR1:+.+"
Remark: Files need to be unprotected for erasure
Enter : ATTR *"DIR1:+.+"U
Enter : ERASE *"DIR1:123456??"
Enter : ERASE *"DIR1:??3+"
Remark: Study selective erasure using templates
Enter : ERASE *"DIR1:+.+"
Remark: Renaming a file/dir
Enter : LET *"DIR2:12" TO "DIR2:RENAMED"
Enter : CAT *"DIR2"
Remark: Rename a directory
Enter : LET *"DIR2" TO "DIRNEW"
Enter : CAT *"DIRNEW"
Enter : ERASE *"DIRNEW"
Enter : CAT *
Remark: Erasing a directory will erase the files within it
Enter : ERASE *"DIR1"
Enter : GO TO *"^" -Make test your current directory
Enter : ERASE *"DIRNEW": CAT *
Enter : ERASE *"CREATE"
Remark: Side B of demo disk now empty : Use side B for CHAPTER 5 examples.
------------------------------------------------------------------------------
4.10 USING TWO OR MORE DRIVES
------------------------------------------------------------------------------
As you know the ROOT represents the physical resources of your system. You can connect up
to 4 drives (A to D) as wall as the two communications ports (CH_A and CH_S)-see section
2.3. Knowing the names of your disks (to do that you CAT * the ROOT) you can access other
drives just by specifying a pathname starting at the ROOT or at your current directory.
To access the other drives treat them as if they were directories placed immediately under
the ROOT. So if you wished to move 'say' to the disk in drive B you could type:
GO SUB * or GO TO *":Name of drive B disk'
Try the following example;
Remark: For users with more than one drive
Remark: Using side A of demo disk and a blank disk in drive B
Enter : FORMAT *"B" TO 'NEW'
Enter : Y
Remark: Formatting drive B
Enter : CAT *":"
Remark: You now have two disksEnter : DIM *":NEW:MATHS.DIR"
Enter : MOVE *"MATHS:+.+" TO ":NEW:MATHS"
Enter : CAT *":NEW:MATHS"
Enter : GO SUB *
Remark: Use of GO SUB * without a pathname.
Enter : GO TO *"NEW:MATHS"
Enter : CAT *
Remark: Your current directory is MATHS in drive B
Enter : DRAW *
Enter : CAT *
Remark: Return to previous directory
Enter : LOAD *":NEW:MATHS:ROOTS.BAS"
Remark: Now try changing your, current directory to MATHS in disk B and LOAD
*"LINEAR.BAS"
Try the following to understand the way of changing drives without knowing the names of
the disks.
Enter : GO TO *":DEMO"
Remark: Your directory is now drive A
Enter : GO TO *"B"d
Enter : CAT *
Remark: Your current directory is now 'NEW' in drive B.
Remark: Try to go back to drive A using GO SUB *"A"d
------------------------------------------------------------------------------
CHAPTER 5
------------------------------------------------------------------------------
5.1 FILES
------------------------------------------------------------------------------
A file may be thought of as a collection of pieces of information bound to the same name.
Until now the concept of a file as a whole unit has been used. A BASIC programme is an
example of a such a file. Using the SPECTRUM in the traditional way, data for example
would be contained in an array, to access any data the whole file would be loaded and
accessed as a whole.
A feature of TOS is that it permits the reading of a part of a file without the need to
read the whole file. This feature is especially useful in preparing large data files where
individual records from the file are to be accessed, as needed for example, in data base,
stock control applications, and other business applications. This allows the creation of
files of any size no longer limiting your applications to the size of the SPECTRUM memory.
------------------------------------------------------------------------------
5.2 CHANNELS
------------------------------------------------------------------------------
TOS accesses (reads or writes) files through channels. A channel is a number associated
with a file that you use to refer to it in the instructions PRINT * (which writes) and
INPUT * (which reads). A Channel also acts as a data buffer (through which date flows)
with some memory containing information on the file, such as its name, size, etc.
TOS provides you with 16 channels. To access a file, choose a free channel (one that is
not being used to access another file) and associate it with the file.
To open a file use the OPEN #* instruction. The PRINT * and INPUT * instructions refer to
output and input to a file through the channel number - which becomes exclusive to this
file until you close it with the CLOSE #* instruction.
Closing a channel frees it, and disassociates it from the file, preventing further access
to the file.
------------------------------------------------------------------------------
5.3 OPEN #*
------------------------------------------------------------------------------
The OPEN #* instruction opens a file, that is, prepares it to be accessed (read or
written). Essentially, this operation consists of associating a channel with a file and
establishing the access mode. In all subsequent access operations the file is referred to
by the number of the channel you associated with it.
You cannot access a file that is not open. Note however, that we are referring to read and
write operations using the INPUT * and PRINT * instructions.
You can access a closed file as a whole with instructions like SAVE *, LOAD * and MOVE *,
but INPUT * and PRINT * are the only instructions that allow access to a specific part of
a file.
The syntax of the OPEN #* instruction is
OPEN #* channel; pathname; mode; [rec-length]
The '#' is printed by the SPECTRUM as part of the OPEN keyword.
The OPEN parameters have the following meaning:
CHANNEL : Number of the channel you want to associate with the file. This channel must not
be associated with another file, and must be in the range of 1 to 16. It can be a numeric
expression.
PATHNAME : Pathname designating the file. Can also designate an SCP, but not a directory.
Can be a string expression.
MODE : Letter (upper or lower Case) defining the access mode. There are four
possibilities:
I : Input only (You can only read the file)
0 : Output only (You can only write in the file)
R : Random access (You can only read or write the file)
A : Append (You can only write in the file. New information is appended to the Previous
one)
REC-LENGTH : This is an optional parameter if the mode is I, 0 or A and defines the number
of bytes (characters) of each record of the file. Must be a number in the range 1 to 256.
Can be a numeric expression. If this parameter is omitted, the last semicolon must not be
Present.
Examples:
100 INPUT "File name?"; f$
110 INPUT "Channel number?"; n
120 DIM *f$
130 OPEN #*n;f$;i
140 REM the file is now open and ready to be read
2000 DIM *"Workfile"
2020 OPEN #*15; "Workfile";r;150
2050 REM the file WORKFILE is now ready to be read or written to with a record length of
150
The mode parameter defines the access mode (input, output, random or append). The last
parameter defines the record length. If omitted, we say that the file is open, as a stream
file; if present, we say that the file is open as a record file. If you specify the r mode
you cannot omit this parameter.
This describes what the file structure is expected to be. If the file is open as a stream
file, you can read or write a variable number of characters up to 256. If you open the
file as a record file, you can only read or write a fixed number of characters the number
you specified in the record-length parameter of the OPEN #* instruction.
Stream files are better suited to deal with information that has no special structure.
Record films have an underlying record structure and are particularly useful when dealing
with data bases, where a record holds information of a fixed length.
Stream files can only be read or written sequentially. When you perform consecutive INPUT
* instructions on a stream file, you read the characters one after the other.
Record files can be read or written in a random manner, you specify - using the 'AT'
statement - the number of the record you want to read with the PRINT * and INPUT *
instructions,
A file is accessed using a file pointer, understanding the concept is important. In stream
files the basic information unit is the character. In record files the basic information
unit is the record (which can have up to 256 charaters). If you want to access a
particular character in a certain record, you must read the entire record. Whichever the
basic information unit is, an open file always has a pointer pointing to it. In stream
files this file pointer points to the character which will be read or written next. In
record files, the file pointer points to the number of the record that will be read or
written next. Record files can also be accessed sequentially, record after record.
When the OPEN #* instruction is executed, the file pointer is initialised to different
values, according to the mode parameter. If the file is open in input or output (stream or
record files) or random (record files), the file pointer is initialised to 1, even if the
file is empty.
If the file is open in the append mode, the file pointer is initialized with the file size
plus 1 (stream files) or with the number of records contained in the file plus 1 (record
files), corresponding to the number of the character or record that is going to be written
next.
If you open a file in output only mode, all its previous contents will be destroyed. Using
the append mode the data is attached to the end of the file without overwriting it.
A record file will be overwritten by specifying a record number lower than the last one on
the file. The changes made to a file become effective when you close it with the CLOSE #*
instruction.
You can also open and read or write SCP's, but the concepts just described vary. These are
described in the next chapter devoted to SCP's.
The following you cannot do with the OPEN #* instruction:
-Specify a channel already in use,
-specify a channel outside the range 1 to 16. Or a record outside the range 1 to 256.
-specify a directory as the argument
-Specify a pathname using a template
-Specify a random access file without a record length.
-Specify the opening of a file in write mode, that is using, output, random or append
modest to a file or disk which is write protected.
------------------------------------------------------------------------------
5.4 LIST *#
------------------------------------------------------------------------------
If a file or SCP is open the CAT * instruction displays an '0' under the 'S' field. To
know in which channel(s) the file is open, its mode, type (stream or record), use the LIST
*# instruction, which displays information on open files, and whose syntax is:
LIST *# [channel number]
The channel number is optional. If you specify it, TOS will only display information on
that channel. If you omit it, TOS will display information on all open channels.
Try entering:
DIM *"TOS.SCR"
OPEN #*3;"tos.scr";i
This instruction opens the file 'TOS.SCR' in channel 3 in the stream input mode.
Now enter:
LIST *#
The fist line listed is the pathname of the file, starting at the root. Next comes a
header and the corresponding information. Last line tells you how many free channels you
have left. The information on the open file includes:
Ch : Channel number 1 to 16
T : Channel type: slow (s) or fast (f)
M : Mode: I, 0, R, or A (one of the four modes in which you can open a file)
Typ : File type: stream (STR) or record (REC)
Rln : Record length (the number you specified in the OPEN #* instruction. If the file type
is stream, the value shown is 1)
Pointer : File pointer (this is the number of the character or record that is going to be
read or written next, if the file is open as a stream or record file respectively. The
first character or record is number 1)
Size : The size of a file in bytes. In input only, this value is fixed. In all other modes
this value may grow according to what you write in the file.
Now enter:
DIM *"TOS.BAS" :SAVE *"SCREEN.SCR" SCREEN$
OPEN #*7;"tos.bas";r;20
OPEN #*16;"screen.scr";a
followed by;
LIST *#
This lists information an all open channels.
Please note:
1) Channel 3 is fast (T field) and 7 and 16 are slow.
2) File "TOS.BAS" is open as a record file with record length (Rln) of 20 bytes
(characters) and the file pointer is initialised to 1.
3) File "SCREEN.SCR" is open as a stream in append mode, which is why the file
pointer is initialised to 6918 (one plus the size, that is, the number of the character
that will be written next).
Finally, 3 channels open leave 13 channels free.
If there is no channel open, the LIST *# will print:
16 channels free
No channels open
If you specify the number of a channel that is not open, TOS will generate the error
message:
Channel not open
If you specify a channel number outside the 1 to 16 range, you will get the error message:
Illegal channel number
The LIST *# will still work if the channel is open to an SCP, with a few exceptions (see
chapter on SCP's).
------------------------------------------------------------------------------
5.5 RANDOM ACCESS and SEQUENTIAL files
------------------------------------------------------------------------------
This section describes the use of random and sequencial access files.
Files can be used to store and retrieve information other than BASIC or machine code
programs. For example, they can be used to keep a record of your bank account, your
appointments or just a sequence of results from a calculation.
The new commands that allow you to use files from within a BASIC program work just like
PRINT and INPUT but act on files instead of the screen or the keyboard.
To explain the use of these commands two small programs will be used. The first
demonstrates the use of sequential files, and the second of random or direct access files.
Suppose You went to check it a number matches any of a sequence you have previously
created and stored in a data file named 'TABLE.DAT'.
First you have to create this file. The program to do it could be something like this:
100 DIM *"TABLE.DAT"
110 OPEN #*1;"TABLE:DAT";0
We have created the file and then opened it for output (0 symbolizes output) through
channel 1.
120 REM Table input routine
130 INPUT "How many do you wish?";a
140 FOR n=1 TO a
150 INPUT "Enter Number";a$
160 PRINT *#1;a$+CHR$13
170 NEXT n
180 CLOSE #*1
The main body of the program ends here closing the file. In line 160 we do not print the
number, but its string representation and use a carriage return (ASCII code 13) after the
number as a SEPARATOR. In a sequential file such as this, the charaters are printed one
after another and items must be separated, otherwise you will not be able to read them
back separately.
Several types of separators are recognised by the extended BASIC. You can use commas, tabs
(CHR$6) or quotes. Quotes must be used in pairs and everything between them will be
considered a string. This way you can save a string that has a separator code in it. If
you want to save a string that includes quotes, then use two quotes like this:
""Hello"".
After running this program there will be a file in your disk with all the numbers you have
entered.
Use the following program to see how to check whether a number belongs to this table or
not:
200 LET TRAP=23729:LET SYSERR=23728
300 OPEN #*1;"TABLE.DAT";i
310 POKE TRAP,255
320 PRINT "0 ends Program"
330 INPUT "Number to check";n
340 IF n=O THEN GOTO 440
350 INPUT *#1;p$
360 IF PEEK SYSERR <>0 THEN GOTO 410
370 IF VAL (p$) <>n THEN GOTO 350
380 PRINT "Number ";n;" belongs to the table"
390 RESTORE *#1
400 GOTO 330
410 PRINT "Number ";n;" does not belong to the table"
420 GOTO 3?0
430 REM Program end
440 CLOSE #*1
450 POKE TRAP,O
460 PRINT "End of program"
Line 200 defines variables used for error trapping-see appendix E. Line 310 enables the
error trapping routine. The loop in line 330 checks if the number presently entered
figures in our list by checking it against all the numbers in the file. If you have
already run the previous programme then enter run 2OO.
In line 350 a value is INPUT * from the file. This value is in the form of a string (p$)
and is converted to a number in line 370 using VAL. All information transmitted to or from
a file must be in string format.
The RESTORE in line 390 resets the file pointer so that every search starts at the
beginning of the file.
The most important points concerning files and sequential access modes are;
1 - You can only use strings when reading or writing to a file.
2 - These strings have a maximum length of 256 bytes.
3 - You cannot use string arrays with more than one dimension for input.
4 - There must be 2 separator between strings in a file or you will not be able to read
them back separately.
5 - There must be only one string expression in each PRINT * statement. It you want to
print several items join them by a Plus '+'.
6 - In a sequential file you can only read or write items one after the other.
7 - If you open an already existing file for output its previous contents will be lost.
Another important point about files is record access.
You can write to a file as if it were an endless tape, separating the items for later
reading, or you can define a fixed record length and every time you access the file the
information transfer will be made in chunks of fixed length, disregarding the separator
characters. For example enter:
DIM *"NAMES" (As a direct command)
100 OPEN #*1;"NAMES";0;30
110 FOR n=1 TO 20
120 INPUT "Name";n$
130 PRINT *#1;n$
140 NEXT n
150 CLOSE #*
This program will prompt for and write 20 names to a file called NAMES, each using 30
bytes. If n$ is longer than 30 bytes, only the first 30 will be written, if Shorter, the
remaining bytes will be filled with blanks.
The names may be read back using this program:
200 OPEN #*1;"NAMES";I;30
210 FOR n=1 to 20
220 INPUT *#1;a$
230 PRINT a$
240 NEXT n
250 CLOSE #*
This program works without using separators, but you must know in advance the record
length you are going to use. You could remove the carriage return from line 160 in the
Program that generates the "TABLE.DAT" file (see above) if You introduced a
fixed record length in line 110.
You must read the file using the same record length you used when you wrote it, otherwise
you will read back different strings from those you wrote.
This can be useful to study the contents of a file. For example:
100 INPUT "Name of file to read";n$
110 LET x=1
120 OPEN #*1;n$;I;1
130 INPUT *#1;a$
140 PRINT x,a$;" ";CODE a$
150 LET x=x+1
160 GOTO 130
will read a file and display each character and its code, until the end of file is reached
and the program stops (try it with NAMES)
The next example is an direct access files. With this type of access you can read or write
to any place in the file but you must use fixed length records. This mode is useful to
define records such as those in an address book where each entry has a predefined size.
The demonstration programme reads records without resetting the file pointer every time a
search is made, and writes anywhere in the file without upsetting other records.
This program uses only one of the sixteen channels and the string slicing function to
separate fields. Alternatively you could use several channels and allocate one to each of
the fields thus avoiding the need for the string slicing function.
Please refer to the program 'ADDRESS' on your demo disk.
90 LET TRAP=23729
95 POKE TRAP,255
100 DIM *"address.dat"
110 POKE TRAP,O
115 OPEN #*1;"address.dat";r;10O
120 INPUT "1-Read,2=Write and 3=End";h$
130 IF h$="2" THEN GOTO 500
135 IF h$="3" THEN GOTO 610
140 IF h$<>"1" THEN GOTO 120
150 REM Read a record
160 INPUT "Record number";n
165 REM File size limited to 65535 records
170 IF n>65535 OR n<1 THEN GOTO 160
180 INPUT *#1;a$;AT n
190 CLS
200 PRINT AT 4,3;"Name: ";a$( TO 30)
210 PRINT AT 8,0;"Address: ";a$(31 TO 60)
220 PRINT AT 12,7;"Phone: ";a$(61 TO 75)
230 PRINT AT 16,2;"Notes: ";a$(76 TO)
Z40 INPUT "Enter to continue";h$
250 GOTO 120
500 REM Write a record
510 INPUT "Record number ";n
520 IF n>65535 OR n<1 THEN GOTO 510
530 CLS
540 DIM n$(30): DIM b$(30): DIM p$(15): DIM c$(25)
550 INPUT "Name ";n$
560 INPUT "Address ";b$
570 INPUT "Phone ";p$
590 INPUT "Notes ";c$
590 PRINT *#1;n$+b$+p$+c$;AT n
600 GOTO 120
610 CLOSE #*1: PRINT "Finished"
LINES 90, 95, 110 are used for the error trapping. It is not possible to DIM * an existing
file name. The second time through the programme, an error would stop the programme, these
lines prevent this. See Appendix E
LINE 115: Opens the file 'address.dat' as a random access file with a record length of 100
(256 maximum)
LINE 170: Is the system limit, normally 2 lower limit would apply
LINE 160: Read from the disk the record n (a$ will need slicing)
LINE 590: Writes the record to the disk, as a single string
LINE 610; The file must be closed. Otherwise records will not be updated.
The BASIC programme could be more sophisticated, the point here is to demonstrate the way
that the TOS commands are used.
Specific records are written or read according to the number following the AT statement.
Access times to specific records can be much shorter than with sequential type files since
to access a record it is not necessary to read through the whole file.
Please note the following points:
1 - When a record is input from a file, the different fields can be separated with the
string slicing function (TO).
2 - Care must be taken when writing to a record because if you specify a record number
past the end of file the file size is increased until the record belongs to the file.
3 - The record number must be an integer between 1 and 65535.
The following is the complete syntax for the two commands:
PRINT *#n; Str-exp [;AT p]
INPUT *#n; Var [;AT p]
n : channel number (1 to 16)
Str-exp : any string or string expression resulting in a string with no more than 256
characters.
Var : any string variable or one dimensional string array
P : record number (1 to 65535). Optional when using random access files. If not defined,
the next record position is used.
A last Point: everything said about sequential files is also true when using serial
channels since TOS treats both in much the same way.
------------------------------------------------------------------------------
5.6 RESTORE *
------------------------------------------------------------------------------
The RESTORE * instruction, whose syntax is:
RESTORE *# channel-number
Allows you to reset the file pointer (to the value 1) bringing it back to the beginning of
the file. This is especially useful in files open as streams which can only be accessed
sequentially.
By using this command when the file is open in input only (i), you will start reading the
beginning of the file again.
If the file is open in write only or append modes you will start overwriting it.
This instruction allows you to update only the initial characters of a stream file without
destroying the rest of the file. Only in output mode does it destroy all the file
contents.
Open the file in the append mode and then use the RESTORE * instruction: You can now start
rewriting the file from the beginning without destroying all its contents.
The process is the same for record files, although you can avoid the use of RESTORE * by
always specifying the number of the record you want, they can also be accessed
sequentially.
------------------------------------------------------------------------------5.7 CLOSE *
------------------------------------------------------------------------------
When you finish accessing a file you must close it. This is done with the CLOSE #*
instruction, whose syntax is:
CLOSE #*[channel-number]
(Note that the # is printed by the SPECTRUM as part of the CLOSE keyword.)
If you specify a channel number, you will only close the corresponding channel (and
associated file). It you omit it, all the open channels are closed. Closing a file (or
SCP) implies disassociating it from a channel.
However, if the mode is other than input only, there is more involved.
Disk files are described by a few bytes in the disk directory containing the name of the
file, its size and a description of which disk blocks (1K byte each) contain data
belonging to that file. Therefore, it the file was open in a write mode (output only,
random or append), the CLOSE #* instruction must update these bytes to reflect the new
file contents.
The way in which CLOSE #* does this depends on the mode in which the file is open. NOTE
that data written into a file is NOT safe until you CLOSE that file. If something happens
(e.g. a power failure) before the file is closed, you may lose information just printed to
that file. So - never keep a file open in write mode longer than is necessary.
When you open a file in the output only mode the file size is initialised to zero, even if
the file already has some data. This is because the output only mode overwrites the
previous contents of a file. However, the old version of the file is not destroyed until
you close the file.
As an example, open a file in the output mode only. To avoid destroying one of your files,
copy one and work on it. Enter:
MOVE *"SCREEN.SCR" TO "NEWSCR.SCR"
open it with
OPEN #*2;"NEWSCR.SCR";0
and now enter
CAT *
The "S" field shows you that the file 'NEWSCR.SCR' is open. Note that the file
'NEWSCR.SCR', which should be 6917 bytes (being a screen), exhibits a size zero.
The 'Cur' field, which shows the currently used space in the disk, exhibits a value that
is 7k bytes larger than the sum of the allocated spaces of all the files.
This is because the old version of 'NEWSCR.SCR' is still there, hidden by the system.
If you enter:
LIST *#2
you can list additional information on channel 2, open to this file.
Note this is a fast channel. The file is open as a stream in output only mode, has size 0
and the next character to be written will be the first, This information concerns the open
version of the file.
You can new start writing data on the file. Try running the following program:
10 FOR n=1 TO 80
20 PRINT *#2;"a"
30 NEXT n
Now enter
CAT *
File 'NEWSCR.SCR' now has a size of 80 bytes and an allocated space of 1k. The 'Cur' field
has been incremented by one due to the 1K block allocated to the open version of
'NEWSCR.SCR'. This means that the CAT * instruction follows the development of the file,
allowing you to monitor its growth, as does the LIST *
instruction.
Enter
LIST *#2
Now let us simulate a power failure. Press the reset button of the disk controller. This
resets the entire system. Now enter:
LIST *
The fact that there are no channels open does not mean that they have all been closed. The
term used here is 'aborted', meaning that your work on the open files ('NEWSCR.SCR') is
lost. To better understand this, enter:
CAT *
The file 'NEWSCR.SCR' is still there, with all its 6917 bytes - so you didn't lose the old
version of the file - but you did lose the 80 bytes (1K) used in the new version of the
file.
Now do it Properly. Run the program:
5 OPEN #*2;"newscr.scr";o
10 FOR n=1 TO 80
20 PRINT *#2;"a"
30 NEXT n
40 CLOSE #*2
Now enter:
CAT *
Now the file 'NEWSCR.SCR' has size 80 and the 'Cur' field is consistent with the sun of
the allocated spaces of all the files of disk. Before running this program the value shown
in the 'Cur' field was 6k smaller, which proves that the old version of the file (which
occupied 7 Kbytes) was erased.
This was done by the CLOSE #* instruction.
The same principle applies to the other write modes (random, access and append) with
information written beyond the end of the file when it was opened.
This is the case with append in stream files, and append and random access in record
files, when specifying a record number greater than the last one on file. In such a case,
a system reset will lose all new information. However, if you write over already existing
information, this is immediately replaced and will not be lost even in a power failure.
This is also true with the RESTORE * instruction when in the append mode with stream
files, and append and random access with record files, if you specify an already existing
record number.
In the input mode data is never lost (even if the power fails) because the file is not
being updated.
If you are writing into files always check that all files are closed before turning off
your system, otherwise new information written in your files may be lost.
Errors that may occur with the CLOSE #* instruction are: if you specify a channel not open
or with a number outside the 1 to 16 range, TOS will print: Channel not open and Illegal
channel number respectively.
Extremely unlikely, but possible, is the error message: Directory full on disk <>,
which means the disk directory has no space to hold the name and additional information of
the new version of the file. This will only occur if you have the maximum possible number
of files (128) per side of the disk occupied.
------------------------------------------------------------------------------
5.9 FAST AND SLOW CHANNELS
------------------------------------------------------------------------------
TOS provides you with 16 channels that are divided into two types: fast and slow. Channels
1 to 4 are fast and 5 to 16 are slow.
The difference is due to memory limitations: Each fast channel has a 512 byte buffer
exclusively reserved to it whereas slow channels share a common 512 byte buffer.
TOS uses these buffers to speed up access to the disks. Reading or writing a memory buffer
is much faster than reading or writing the same number of bytes in the disk. So, when you
read a single byte from a file, TOS reads a lot more (256) into the channel memory buffer.
Slow channels share a common buffer, and the data in that buffer belonging to a file can
be destroyed by the data of another file open in another slow channel.
When writing into a slow channel, TOS writes the data in the disk (or SCP) immediately
after the PRINT * instruction, because otherwise a second PRINT *# in another slow channel
would overwrite that data. As a direct consequence, TOS must perform a disk access (in
case of disk files) for each PRINT *# instruction (even if you only print one character),
which slows down the printing process. Hence the 'slow channel' designation.
You can observe this with the following program:
Enter :
DIM *"FILE1" as a direct command
10 LET n=4
20 OPEN #*n;"file1";o
30 FOR i=1 TO 50
40 PRINT *#n;"abcd"
50 NEXT i
60 CLOSE #*n
which stores the same string in 'FILE1' 50 times. Now run the same programme with line 10
modified to make n=5 (channel 5 is slow). The execution time is much longer because TOS
accesses the disk every time line 40 is executed.
In reading operations this difference in speed does not arise unless another slow channel
is used between two input operations.
In this case the date in the slow channel common buffer may be destroyed forcing TOS to
re-read the file.
Before moving to CHAPTER 6 lets CLOSE #* channels that may be open due to the examples of
CHAPTER 5.
CLOSE #*
Closes all channels.
------------------------------------------------------------------------------
CHAPTER 6
------------------------------------------------------------------------------
6.1 Serial communication ports SCP's
------------------------------------------------------------------------------
Your Floppy Disk Controller is equipped with two RS232C Serial Communication Ports
(SCP's),
These R5232C interfaces are referred to as:
"CH_A.SCP"
"CH_B.SCP "
Entering the following will demonstrate this:
CAT *":"
SCP's are a special kind of file that convey data instead of storing it. Data is
transmitted or received in a serial fashion, one bit at a time. TOS uses software and
hardware protocols to ensure that the transmitter only sends data when the receiver is
ready.
The instructions used to exchange information with the outside world via SCP's are: SAVE
*, LOAD *, MERGE *, MOVE *, PRINT * and INPUT *.
------------------------------------------------------------------------------
6.2 SCP CONFIGURATION (FORMAT *)
------------------------------------------------------------------------------
Communication between two computers (and/or peripherals) through an RS232C interface is
only possible when they use matching protocol. To permit a wide range of protocols, TOS
provides an instruction to set all the parameters to the required values.
The syntax of this instruction is:
FORMAT * SCP - pathname
which is distinct from the disk formatting instruction because the 'TO' and the disk name
are missing. As with any instruction using a pathname, you can either start at the root
(i.e. FORMAT *":CH_A.SPC") or you can start at your disk directory.
Enter.
FORMAT *"^CH_A.SCP"
The type SCP is optional, so you could enter:
FORMAT *":CH_A"
TOS prompts for the required values to be entered, but as default uses predefined setting.
If you press ENTER, TOS proceeds to the next question and maintains the previous value for
that parameter. If you press SPACE, TOS terminates the command and maintains the former
values for the subsequent parameters. It you press a key that is neither ENTER, nor SPACE,
nor any of the alternatives asked by the question, TOS repeats the question. Replies may
be entered in upper or lower case.
When FORMATting a serial port, these are the questions asked:
1. Text or Bytes (T/B) ?
If the data type is text answer 'T' this will set bit 7 of every transmitted data byte to
0. If the data type is bytes, all data is transmitted without modification.
2. Auto line feed (Y/N) ?
This question appears if the data type is text. Answering yes, TOS will insert a line feed
(ASCII code 0AH) after each carriage return (ASCII code 0DH).
3. XON / XOFF (Y/N) ?
Choosing this option TOS establishes a software protocol using two special control
characters:
X ON (ASCII code 11H) enabling transmission and X OFF (ASCII code 13H) disabling
transmission.
4. Input with wait (Y/N) ?
Answering no, all read operations to the SCP will return even it the requested data is not
present, as TOS won't wait for data to in the channel buffer. This is somewhat similar to
the INKEY$ function provided by the SPECTRUM. Otherwise TOS will wait for the requested
data.
5. Baud rate (A-P) ?
This parameter determines the number of transmitted bits per second, the transmission
speed. The correspondence between letters and baud rates is:
Letter Baud rate (bits/second)
A 50
B 75
C 110
D 134.5
E 150
F 200
G 300
H 600
I 1.200
J 1.900
K 2.400
L 3.600
M 4.800
N 7.200
O 9.600
P 19,200
6. Parity (E=Even, O=Odd, N=None) ?
This is an error detection mechanism that uses a bit to make the numbers of 1's odd (0) or
even (E). The mechanism can be disabled (N).
7. Stop bits (A=1, B=1.5, C=2) ?
This is the minimal number of bits between the end of one byte and the beginning of the
next.
8. Bits/char (A=5, B=6, C=7, D=8) ?
Number of bits of each data byte. Although the normal value is 8, some equipment uses less
bits. Possible values are 5, 6, 7, and 8.
The factory default setting is:
1 : Bytes
2 : No auto line food
3 : No X ON / X OFF
4 : Input operation with wait
5 : 1200 baud
6 : No parity (none)
7 : 1 stop bit
8 : 8 bits per character
The new setting values defined by the FORMAT * will be destroyed when you turn your system
off or press the Disk controller reset button. However, you can make these new values
permanent by formatting a disk after configurating the SCP's. This will store the
operating system (TOS) in the disk with the current SCP configuration.
If you don't like the names "CH_A" and "CH_B" you can change them with
the LET * instruction.
Note, however, that it is the disk inserted in drive A that provides the operating system.
So if you want to use your own SCP configuration - instead of the factory default system -
you must use this new disk in drive A. Or run the the utility LOSYS in all existing disks
(see appendix c).
You cannot configure an open SCP. If you do, you will get the error message:
<> is open
The angle brackets representing the name of the SCP in question,
------------------------------------------------------------------------------
6.3 TRANSMITTING FILES THROUGH SCP's
------------------------------------------------------------------------------
There are four instructions to exchange files: SAVE *, LOAD *, MERGE * and MOVE *
They all work as the disk files do. The SAVE * instruction allows you to transmit a
program, code or data currently in memory, LOAD * and MERGE * perform the inverse
operation. Note the auto run facility is also available e.g. SAVE *":CH_A" LINE
20.
MOVE * allows you to copy a disk file to an SCP (or vice-versa) or an SCP to another SCP.
The SCP's used must be configured with the data type 'bytes', since the data type 'text'
gives special interpretation to some codes. TOS does not check this. These instructions
deal with whole files. To transmit or receive byte by byte the PRINT * and INPUT *
instructions must be used.
SCP's are interpreted by TOS as normal files with special characteristics. Thus, you can
also access SCP's with PRINT * and INPUT * instructions. To do so you have to open and
close the SCP's.
------------------------------------------------------------------------------
6.4 OPEN #*
------------------------------------------------------------------------------
The syntax of this instruction is:
OPEN #*channel-number;SCP-pathname;mode;record-length
Using SCP's the random access mode (r-input or output) has a special meaning, since each
SCP can transmit and receive. This mode means you can transmit by writing with PRINT *# or
receive by reading with INPUT *#.
As SCP's have no permanent data (SCP's send data - they do not store it) the append mode
is given a special meaning. For instance, if you enter:
OPEN #*1;":ch_a";a
This means that "CH_A.SCP" will be open in the output only mode, with the data
type 'text', the auto line feed and X ON / X OFF options independentely of the first four
parameters of the SCP configuration settings.
In all other modes the SCP is programmed with the setting it had when you opened it.
As the append mode has this special meaning, there is no need to specify a record length.
It you do TOS prints the error message:
Illegal mode/type combination
Also you cannot use the random access mode (input and output) if the X ON / X OFF Protocol
option is on, because one way (transmit or receive) of the channel is needed to transmit
the X ON and X OFF control characters, and it therefore cannot carry data too. If you have
an SCP configurated to support an X ON / X OFF protocol and try to open it in the random
access mode, TOS will generate the error message:
Illegal mode / SCP configuration
The same message is issued it you try to open an SCP and specify a record length when the
SCP is configured with the data type 'text'. This is because words have a variable length.
You cannot open an SCP input or random access in a slow channel because the system may
need to use the slow channel common buffer to access another slow channel before it reads
and stores all the bytes received by the SCP.
This is no problems with disk files because even if the bytes in the buffer are destroyed
the disk file can be read back. SCP's do not have a memory and the bytes are only received
once. In output only or append modes this is no problem because SCP's transmit all the
information as you write it with the PRINT * instruction.
So, if you try to open an SCP in the input only or random access modes, TOS will generate
the error message:
Cannot use a slow channel
Unlike disk files, you cannot open an SCP in more than one channel (even if the mode is
input only) because data read from an SCP is no longer available for another read
operation. This is because SCP's have no memory. If you could read an SCP from more than
one channel the bytes received would be dispersed among those channels and no channel
would receive the whole information.
If you try to open the same SCP in more than one channel you will got the error message:
<> is open
------------------------------------------------------------------------------
6.5 CLOSE #*
------------------------------------------------------------------------------
The CLOSE #* instruction is no different from the disk file CLOSE #* instruction except
when the SCP is open in one of the write modes and with the data type 'text'.
In this case an end of file character (^Z,ASCII code, 1AH) is sent through the SCP to
inform the other party that no more date will be sent through the channel.
------------------------------------------------------------------------------
6.6 LIST *#
------------------------------------------------------------------------------
This instruction lists information on open channels and has a different presentation with
disk files and SCP's because the information to be displayed is different.
With SCP's the information listed includes:
Ch - Channel number (1 to 16)
T - Channel type: slow (S) or fast (F)
M - Mode: I,O,R or A
Typ - Type: stream (STR) or record (REC)
Rln - Record length : number of bytes of each record
Baud - Baud rate 50 to 19200 baud
Dat - Data type Text (TXT) or bytes (BYT)
A - Auto line feed : yes (Y) or no (N)
X - XON/XOFF protocol : yes (Y) or no (N)
W - Wait on input : yes (Y) or no (N)
------------------------------------------------------------------------------
6.7 RESTORE *
------------------------------------------------------------------------------
If the SCP is open in input only or random access mode, this instruction flushes the input
buffer, erasing all bytes in the channel buffer waiting to be read.
If the SCP is open in another mode this instruction has no effect.
------------------------------------------------------------------------------
APPENDIX A - ERROR MESSAGES
------------------------------------------------------------------------------
This appendix includes the list of all the error codes and the messages which the system
generates. To help you discover why the error arose a list of reasons is given below for
each of the error messages.
The symbols <> are used to represent a name output by the system
------------------------------------------------------------------------------
30 ILLEGAL PATHNAME
------------------------------------------------------------------------------
-A character with ASCII code outside the range 32 to 126
-more than 64 characters (including spaces)
-no characters besides spaces or no characters at all
-spaces between two characters where neither of the characters is a separator (':', '^' or
'.').
-a filename with more than 8 characters or an extension with more than 3
-a name and/or type without characters (spaces do not count)
-a file name with more than one '.'
-two colons (':') together
-an up arrow ('^') and a colon (":") together
-an up arrow preceded by a character other than an up arrow
-a template character ('+' or '?') not in the last file name, that is, a colon after a
template character
------------------------------------------------------------------------------
31 NON EXISTENT PATH
------------------------------------------------------------------------------
A pathname beginning with up arrows tried to go higher than the root. Either you used more
up arrows than you should or your current directory is not as low as you thought.
------------------------------------------------------------------------------
32 ILLEGAL USE OF A ROOT NAME
------------------------------------------------------------------------------
You cannot specify (1) the root or (2) a name in the root (disk name or SCP). This error
can occur in the following instructions that have a pathname as their argument:
(1) All except GO TO *, GO SUB * and CAT *
(2) DIM *, ERASE * and SAVE *
------------------------------------------------------------------------------
33 <> HAS WRONG TYPE
------------------------------------------------------------------------------
(1) a file (2) a directory or (3) an SCP was specified where not allowed. This error can
occur in the following instructions:
(1) GO TO *, GO SUB * and FORMAT * (SCP and disk.)
(2) OPEN #*, MOVE *, FORMAT * (SCP), LOAD * and MERGE *
(3) GO TO *, GO SUB *,ATTR * and FORMAT * (disk)
------------------------------------------------------------------------------
34 <> DOES NOT EXIST
------------------------------------------------------------------------------
You specified a pathname in which a name (not necessarily the last one) does not exist.
Note that this does not mean that the name does not exist in your system: it just means
that it was not found in the path specified in the pathname. This error can occur in all
the instructions requiring pathnames, except DIM * and FORMAT * (disk).
------------------------------------------------------------------------------
35 <> ALREADY EXISTS
------------------------------------------------------------------------------
You tried to create a name that already exists. This error can occur in the DIM *, LET *
and MOVE * instructions.
------------------------------------------------------------------------------
36 TYPES DO NOT AGREE
------------------------------------------------------------------------------
This error occurs in LET * if the type (file, directory or SCP) of the second pathname
does not agree with that of the first.
LET * can only change the name, not the type.
------------------------------------------------------------------------------
37 TEMPLATE NOT ALLOWED
------------------------------------------------------------------------------
You must use a name not a template. Templates are only allowed in ERASE *, MOVE * (only in
the first Pathname), CAT * and ATTR *.
------------------------------------------------------------------------------
38 NO FILES MATCHING THE TEMPLATE
------------------------------------------------------------------------------
You specified a template correctely, but there were no files (or directories or SCP's
matching it). This error can occur in the ERASE *, MOVE *, CAT * and ATTR * instructions.
------------------------------------------------------------------------------
39 DIRECTORY FULL ON DISK <>
------------------------------------------------------------------------------
The system tried to create or update a file but there was no space in the disk directory.
This error can occur in the DIM *, CLOSE #*, MOVE * and SAVE * instructions.
The disk directory can hold 128 entries. The disk itself uses one entry for its name.
Other directories also use one entry, and files occupy one entry per each 16K in size.
Therefore, a file with 7K uses one entry and a file with 50K uses 4 entries.
------------------------------------------------------------------------------
40 DISK <> FULL
------------------------------------------------------------------------------
The disk has no more space. This error may result from SAVE *, MOVE * or PRINT *
instructions.
------------------------------------------------------------------------------
41 NO ROOM FOR FILE IN CHANNEL <>
------------------------------------------------------------------------------
This error occurs in the PRINT * instruction with a file open as a record file, with a
record number so high that it would increase the file size to a value beyond the free
space in the disk. With this error the disk maintains its free space.
------------------------------------------------------------------------------
42 <> IS WRITE PROTECTED
------------------------------------------------------------------------------
You tried to update or erase a file or directory that has been protected by the ATTR *
instruction.
This error can be generated by the SAVE *, ERASE *, MOVE * and OPEN * instructions.
------------------------------------------------------------------------------
43 DISK <> IS SOFTWARE W/P
------------------------------------------------------------------------------
You cannot create, update, erase, rename or even write protect a file or directory defined
in a disk that has been write protected by software with ATTR *. This error can be
generated by SAVE *, OPEN #*, CLOSE *, DIM *, ERASE * LET *, MOVE *, PRINT * or ATTR *.
Note that the FORMAT * (disk) does not generate this error because this instruction
formats a disk, even if it software write protected.
------------------------------------------------------------------------------
44 DISK <> IS HARDWARE W/P
------------------------------------------------------------------------------
The disk is hardware write protected by the write protect tabs. The FORMAT * (disk)
instruction will not format a hardware write protected disk, but generates the error:
'hardware fault on disk <>' instead.
------------------------------------------------------------------------------
45 <> HAS DIRECTORIES
------------------------------------------------------------------------------
You cannot erase a directory that contains other directories. You must erase the lower
level directories first and then proceed upwards, erasing all the directories until you
can finally erase the one you want. This error is generated by the ERASE * instruction.
------------------------------------------------------------------------------
46 <> HAS FILES OPEN
------------------------------------------------------------------------------
You cannot erase a directory that contains open files. You must close all files defined in
the directory before you can erase it. This error is generated by the ERASE * instruction.
------------------------------------------------------------------------------
47 <> HAS FILES W/P
------------------------------------------------------------------------------
You cannot erase a directory that contains write protected files. You must unprotect them
with the ATTR * instruction before you can erase the directory. This error is generated by
the ERASE * instruction.
------------------------------------------------------------------------------
48 CANNOT ERASE CURRENT DIRECTORY
------------------------------------------------------------------------------
You cannot erase a directory if it is your current directory. Change it with GO TO *. This
error is generated by the ERASE * instruction.
------------------------------------------------------------------------------
49 CANNOT CREATE MORE DIRECTORIES
------------------------------------------------------------------------------
You can create up to 15 directories in each side of each disk. This error is generated by
the DIM * instruction if you try to create more. The structure of the directory tree does
not matter.
------------------------------------------------------------------------------
50 ILLEGAL DIRECTORY SPECIFICATION
------------------------------------------------------------------------------
This error is generated by the LET * instruction if the first and second pathnames specify
names (files, directories or SCP's) defined in different directories.
------------------------------------------------------------------------------
51 DIRECTORY STACK OVERFLOW
------------------------------------------------------------------------------
The directory stack has only 8 levels. This message appears if you execute a GO SUB *
instruction at level 8.
------------------------------------------------------------------------------
52 CANNOT RETURN FROM LEVEL 0
------------------------------------------------------------------------------
You execute a DRAW * instruction while at level 0. Probably a DRAW * without a GO SUB *.
------------------------------------------------------------------------------
53 CHANNEL BUSY
------------------------------------------------------------------------------
This error is generated by the OPEN #* instruction it you specify the number of a channel
that is already open. Change the channel number or close the other file first.
------------------------------------------------------------------------------
54 CHANNEL NOT OPEN
------------------------------------------------------------------------------
You tried to execute CLOSE *, LIST *#, PRINT *#, INPUT *# or RESTORE *# with a number
corresponding to a channel that is not open.
------------------------------------------------------------------------------
55 ILLEGAL CHANNEL NUMBER
------------------------------------------------------------------------------
You specified a channel number outside the range 1 to 16 in one of the following
instructions: OPEN #*, CLOSE #*, LIST *#, PRINT #*, or RESTORE *#. Possibly a variable
with a wrong value.
------------------------------------------------------------------------------
56 NO CHANNELS OPEN
------------------------------------------------------------------------------
You executed a CLOSE #* without argument (close all channels) but all channels were
already closed. This message also appears in the LIST *# instruction, but constitutes no
error, just an information report.
------------------------------------------------------------------------------
57 NO CHANNELS FREE
------------------------------------------------------------------------------
This error message is generated by the instructions that access files as a whole, that is,
SAVE *, LOAD *, MERGE * and MOVE *. The three first need one channel and MOVE * needs two.
This error occurs if there are not enough free channels.
------------------------------------------------------------------------------
58 NO FAST CHANNELS FREE
------------------------------------------------------------------------------
This error can only occur when trying to copy an SCP to a file or another SCP. SCP's can
only be read using fast channels. The MOVE * instruction also issues this message if
channels 1 to 4 are busy.
------------------------------------------------------------------------------
59 CHANNEL TABLE OVERFLOW
------------------------------------------------------------------------------
The channel table holds information on open channels and has a capacity of 128 entries.
SCP's use one entry each. Files use one entry per 16K in size (an empty file uses one
entry). This error occurs if TOS tries to exceed this number of entries. Closing a channel
releases space in the table. This error can be generated by SAVE *, LOAD *, MERGE *, OPEN
#*, MOVE * and PRINT *
------------------------------------------------------------------------------
60 ILLEGAL MODE/TYPE COMBINATION
------------------------------------------------------------------------------
-This error expresses an incompatibility between the mode and type in the OPEN #*. It will
occur in the following situations:
-(1) - opening a disk file in random access mode (r) without specifying the record length.
-(2) - opening an SCP in append mode (2) and specifying a record length.
------------------------------------------------------------------------------
61 ILLEGAL RECORD LENGTH
------------------------------------------------------------------------------
You specified a record length in the OPEN #* instruction that is outside the range 1 to
256. Any variable used in the instruction must be within this range.
------------------------------------------------------------------------------
62 CANNOT USE A SLOW CHANNEL
------------------------------------------------------------------------------
You cannot open an SCP in input or random access mode and specify a slow channel. Use a
fast channel.
------------------------------------------------------------------------------
63 <> is OPEN
------------------------------------------------------------------------------
You tried to open a file or SCP, but it was already open in another channel. You can only
open a disk file in more than one channel if the mode is input only. This error is
generated by the OPEN #* but it can also occur in the SAVE *, LOAD *, MERGE * and MOVE *
instructions which open files and SCPs to access them.
------------------------------------------------------------------------------
64 <> CHANGED WITH FILES OPEN
------------------------------------------------------------------------------
You replaced a disk but the old one had at least one file open. You must replace the old
disk to close the files(s) before using a new disk.
------------------------------------------------------------------------------
65 CANNOT FORMAT WITH FILES OPEN
------------------------------------------------------------------------------
This error occurs in the FORMAT * (disk) instruction if you have at least one file or SCP
open. You must close all files before formatting a disk.
------------------------------------------------------------------------------
66 ILLEGAL DRIVE NAME
------------------------------------------------------------------------------
This error occurs in the FORMAT * (disk) instruction if you specify anything than A, B, C
or D (upper or lower case) in the first string. These are the legal drive names, spaces
are ignored.
------------------------------------------------------------------------------
67 ILLEGAL DISK NAME
------------------------------------------------------------------------------
This error occurs in FORMAT * (disk) instruction if you do not specify a single, legal
name in the second string. You must specify a disk name, that is, a directory name not a
pathname.
------------------------------------------------------------------------------
68 BUFFER FULL
------------------------------------------------------------------------------
This error occurs in the INPUT *# instruction when reading fromn an SCP, if the channel
buffer becomes full - data incoming rate greater than system throughput - and you have no
protocol to stop the transmiter. Configure the SCP to appropriate protocol.
------------------------------------------------------------------------------
69 SCP I/O ERROR
------------------------------------------------------------------------------
A transmission error was detected when reading from an SCP.
------------------------------------------------------------------------------
70 ILLEGAL OPERATION ON READ FILE
------------------------------------------------------------------------------
You executed a PRINT *# instruction with a channel number corresponding to a file or SCP
open in input only.
------------------------------------------------------------------------------
71 ILLEGAL OPERATION ON WRITE FILE
------------------------------------------------------------------------------
You executed a INPUT *# instruction with a channel number corresponding to a file or SCP
open in output only or append.
------------------------------------------------------------------------------
72 READ PAST END OF FILE
------------------------------------------------------------------------------
You executed an INPUT *# instruction in a channel corresponding to a file whose pointer
was at the end of the file. No data is read.
------------------------------------------------------------------------------
73 HARDWARE FAULT ON DISK <>
------------------------------------------------------------------------------
This message can be generated by any instruction that reads or writes from or to the disk.
A hardware fault may be detected, either from the disk itself or the drive. A likely cause
is that there is no disk in the drive, and note the system does not work unless there is a
disk in drive A.
------------------------------------------------------------------------------
74 DISK CORRUPTED
------------------------------------------------------------------------------
This message appears if either:
(1) - The disk is partially destroyed through magnetic fields, heat, etc.
(2) - Your operating system loaded in memory is corrupted, due to noise, caused by
electrical interference.
(3) - You have replaced the disk in drive A, and the new disk has a diferent version of
the operating system TOS.
You shoud reset your system. If the message persists, then the disk has becoma corrupted.
In most cases you should be able to recover all or most if your files from the faulty
disk. by copying them onto a good disk.
------------------------------------------------------------------------------
75 ILLEGAL DATA TYPE
------------------------------------------------------------------------------
This error occurs in the LOAD * instruction if you specify an option (CODE, SCREEN$, DATA
or name) that is not the same or compatible with the option of the SAVE * that created the
file. This error is also generatedif you try to load a file not generated by SAVE * or
MERGE * - a file that does not contain a BASIC programme.
------------------------------------------------------------------------------
APPENDIX 6 - TOS summary
------------------------------------------------------------------------------
This appendix presents a brief description of each one of the extended BASIC instructions
provided by TOS in alphabetical order.
For reference,
The arguments between square brackets are optional '[]'.
<> are used to represent a disk name/number/file/ or pathname output by the system.
------------------------------------------------------------------------------
ATTR *
------------------------------------------------------------------------------
Syntax: ATTR * pathname P or U or I or V
The P or U Protects or Unprotects a file respectively whereas I hides a file from the CAT
* display and V unveils it.
Protected files are recognized by the appearance of a P under the rightmost field of the
disk directory. If the file is unprotected, this field appears blank. Obviously neither
'V' nor 'I' will ever be displayed under the status field.
The pathname can be a template, so you can protect (or unprotect), hide (or unveil)more
than one file with the same command.
A protected file cannot be erased or written to. If you protect a disk, then you cannot
write to that disk. Note that the FORMAT * instruction can destroy a protected disk.
------------------------------------------------------------------------------
CAT *
------------------------------------------------------------------------------
Syntax: CAT * [pathname]
Without the pathname, this instruction displays information on all the files defined in
the current directory. It the argument is specified, only the information concerning the
files designated by the pathname (which can be a template) is listed.
This information consists at:
(1) General Data
1 - Pathname of the directory where the files are defined
2 - Its level
3 - The name of the drive where it is physically defined
4 - The disk capacity, the currently used space and the remaining
space, all in K bytes.
(2) File Specific Data
1 - Name (including type)
2 - Size in bytes
3 - Real size in K bytes (the space actually used)
4 - File status (open or closed)
5 - File protection state (write protected or unprotected)
As a special case, executing this instruction in the root shows the physical resources of
your system, that is, the disk currently used and the SCP's.
------------------------------------------------------------------------------
CLOSE #*
------------------------------------------------------------------------------
Syntax: CLOSE #* expression
This instruction closes the open file linked to the channel number given by the
expression.
The channel is disassociated from the file and becomes free.
If the file was open for input only, it suffers no modification. If the file was open for
output only, or for random access (input/output) or append, this instruction updates the
file with the modifications made to the file. If the system is initialized (by pressing
the reset button or switching it off and on) the previous version of the file (prior to
the OPEN #* instruction) will remain unchanged. The modifications made will only be
transferred to the disk after the CLOSE #* instruction.
------------------------------------------------------------------------------
MOVE *
------------------------------------------------------------------------------
Syntax: MOVE * source-pathname TO destination-pathname
This instruction copies a file or SCP to another file or SCP. The source is not destroyed
nor modified. The following combinations are allowed :1 Copying a file to a file makes a
file duplicate allowing you to produce backup copies. 2. Copying an SCP to a file 3.
Copying a file to an SCP. 4. Copying an SCP to an SCP.
The source-pathname can be a template, allowing you to copy several files with a single
command, but in this case (and only in this case) the destination pathname must be a
directory. All the files matching the template will be transferred to this directory,
unless an error occurs.
TOS prints the names of the files (or error messages) as they are being copied.
SCP's cannot be used if you specify a template.
------------------------------------------------------------------------------
DIM *
------------------------------------------------------------------------------
Syntax: DIM * pathname
This instruction creates a file or a directory specified by the pathname. If you want to
create a directory, you must specify a name with the type "DIR". Without it, TOS
will create a file.
Files are created with size 0 and newly created directories are empty. SCP's cannot be
created.
------------------------------------------------------------------------------
ERASE *
------------------------------------------------------------------------------
Syntax: ERASE * pathname [N]
ERASE * erases files, that is, destroys them and removes their names from the directory
where they are defined.
The pathname can be a template, so you can erase more than one file with a single command.
This instruction will generate an error if you try to erase a file or directory that is
write protected or belongs to a protected disk.
TOS asks for a confirmation of erasure with the Question:
Erase <> (Y/N)? unless an 'n' is specified in the initial command
------------------------------------------------------------------------------
FORMAT * (disk)
------------------------------------------------------------------------------
Syntax: FORMAT * drive-name TO disk-name
The FORMAT * instruction formats the disk currently inserted in the drive specified. Note
that you must specify the name of the drive (A, B, C or D), not the pathname of the disk.
CAUTION: This instruction destroys all the files contained in the disk. The software
protection provided by ATTR * is not effective. The only way to protect a disk against
formatting is to protect it by hardware, using the disk's protection tabs.
Since this is a dangerous instruction (even more so than ERASE *), TOS checks your request
before formatting by printing:
Format disk in drive <> (Y/N)?
Typing N will abort the command
If you specified drive A, TOS will print an additional message:
Change diskette and press ENTER
and waits for you to press the ENTER key before proceeding.
This allows you to format disks (without destroying the disk you are using) even if you
have only one drive (which is necessarily drive A).
------------------------------------------------------------------------------
FORMAT * (SCP)
------------------------------------------------------------------------------
Syntax: FORMAT * SCP-pathname
If the string expression is a pathname designating a SCP, you can change the configuration
of that SCP. TOS prints the following questions:
Text or bytes (T / B)?
Auto line feed (Y / N)?
Software Protocol (Y / N)?
Input with wait (Y / N)?
Baud rate (A - P)?
Parity (N=none, E=even, O=odd)?
Stop bits (A=1, B=1.5, C=2)?
Bits/char (A=5, B=6, C=7, D=8)?
In each case, you must type one of the letters shown above. You can hit ENTER if you want
to proceed to the next parameter without changing the value of the current one, or SPACE
if you don't want to change any of the subsequent parameters.
------------------------------------------------------------------------------
GO SUB *
------------------------------------------------------------------------------
Syntax: GO SUB * [pathname] or GO SUB *"drivename"d
The GO SUB * instruction saves the current directory in a special stack, known as the
'directory stack'.
If the pathname is specified, then TOS changes the current directory to the one designated
by the pathname.
This instruction is used in conjunction with DRAW * as an easy means of returning to the
original directory - even without you knowing which this is. Several GO SUB * instructions
can be nested. The CAT * instruction shows the current level of GO SUB * nesting.
It you use the 'd' Parameter you must specify the drive name (A,B,C,D) and not the
pathname. Hence you can move to another drive without knowing the disk name. Note that
your directory level will be incremented as the stack directory is updated.
------------------------------------------------------------------------------
GOTO *
------------------------------------------------------------------------------
Syntax: GO TO * pathname or GO TO *"drivename"d
This instruction changes the current directory to the one designated by pathname. It is
similar to GO SUB *, except it does not save the current directory in the directory stack.
Similarly to GO SUB * the "d" option is available. Except that once more the
directory stack is not used.
------------------------------------------------------------------------------
INPUT *
------------------------------------------------------------------------------
Syntax: INPUT *#n; VAR$ [;AT p]
Reads a character(s) or a group of characters (i.e. a record) from a file or SCP via a
channel.
n-specifies a channel (From 1 to 16)
VAR$-Any string variable or one dimension string array.
P-Record number (1 to 65535). Used to point to next record to be accessed in the random
access mode. If ommited the next record is used.
------------------------------------------------------------------------------
LIST *
------------------------------------------------------------------------------
Syntax: LIST *
The LIST * instruction lists information on the current directory and an all directories
stored in the stack.
This information includes:
1 : The pathname of the current directory
2 : Its level
3 : The drive where its disk is inserted
This information is partially displayed in the first two lines of the listing produced by
CAT *.
------------------------------------------------------------------------------
LIST *#
------------------------------------------------------------------------------
Syntax: LIST *# [channel number]
If the channel number (Can be a numerical expression) is given, this instruction lists
information of the corresponding channel.
If the channel is not open, an error message is generated.
If the expression is omitted, this instruction lists information on all open channels.
This information includes:
For the channel(s) open to a file
-Channel number
-Channel type (fast or slow)
-Mode: i - input (read only)
a - output (write only)
r - random access (read/write)
a - append (write at the end of the file)
-Type (record or stream)
-Record length (1 if stream)
-Current record (file pointer position)
-Size (file size in bytes)
Channel open to an SCP
-Channel number
-Mode: i - input (receive only)
o - output (transmit only)
r - full-duplex (transmit/receive)
a - output of text with auto line feed and software
protocol
-Type (record or stream)
-Record length (1 if stream)
-baud rate (50 to 19200 baud)
-Data type (text or bytes)
-Auto line-feed - yes (Y) or no (N)
-XON/XOFF Protocol - yes (Y) or no (N)
This instruction also prints the number of free channels.
------------------------------------------------------------------------------
LOAD *
------------------------------------------------------------------------------
Syntax: LOAD * pathname load-option
The LOAD * instruction is very similar to its equivalent in the SPECTRUM's BASIC. The load
options are the same.
The Pathname can represent an SCP, allowing you to receive BASIC programs (or code)
directly from another computer.
------------------------------------------------------------------------------
MERGE *
------------------------------------------------------------------------------
Syntax: MERGE * Pathname
This instruction is similar to its equivalent of the SPECTRUM BASIC language and merges a
disk BASIC program to a program already existing in the memory of the SPECTRUM
------------------------------------------------------------------------------
LET *
------------------------------------------------------------------------------
Syntax: LET * old-pathname TO new-Pathname
This instruction renames a file, directory or SCP. Both pathnames must designate the same
directory, This renaming operation does not affect the protection attribute.
------------------------------------------------------------------------------
OPEN #*
------------------------------------------------------------------------------
Syntax: OPEN #* expression 1;pathname;mode[expression 2]
This instruction opens a file or SCP and associates a channel with it, allowing you to
access it through the instructions PRINT * and INPUT *.
expression 1 - channel number
pathname - pathname of the file or SCP
mode - i - input (read only)
o -
output (write only)
r -
random access (read/write)
a -
append
expression 2 - record length
------------------------------------------------------------------------------
PRINT *
------------------------------------------------------------------------------
Syntax: PRINT *#n;STR$; [;AT P]
Writes characters or groups of characters (i.e. records) to a file or SCP via a channel.
n-Specifies channel number (1 to 16)
STR$-Any string or string expression with no more than 256 characters.
P-Record number (1 to 65535) used to point to next record to be accessed in the random
access mode. Can be ommited in which case the next record will be used.
------------------------------------------------------------------------------
DRAW *
------------------------------------------------------------------------------
Syntax: DRAW *
This instruction is used in conjuntion with GO SUB * to retrieve directory information
from the directory stack, and thus return to the directory that was current when the last
GO SUB * instruction was executed.
The directory level is decremented by one. An error occurs if you try to execute this
instruction in level 0.
------------------------------------------------------------------------------
SAVE *
------------------------------------------------------------------------------
Syntax: SAVE * pathname save-option [n]
The SAVE * instruction is very similar to its equivalent in the SPECTRUM's BASIC. The
save-options are the same.
When the optional [n] parameter is given TOS will overwrite an existing file with the same
filename without the usual prompting:
<> already exists
Supersede (Y/N) ?
The pathname can represent an SCP, allowing you to transmit BASIC Programs (or code)
directly to another computer.
------------------------------------------------------------------------------
APPENDIX C - UTILITY PROGRAMMES
------------------------------------------------------------------------------
The demonstration disk contains a number of utility programmes to perform certain useful
operations. This appendix will explain the use of these programmes. They may be found
under the directory 'UTIL'.
The programmes contained are BACKUP, DUMP, LPRINT and LOSYS.
C.1 BACKUP
This programme will copy an entire disk, sector by sector, copying all the contents. This
allows the creation of backup copies, and will operate by copying the disk in drive A to
any of the other drives. It is Possible to copy to drive A, in which case the prompt will
appear to 'change disks now'. It is necessary to shuffle between the master and the target
disk until the copy is complete. Using any other drive the copy will proceed without
stopping.
C.2 LOSYS
This utility allows the updating of the operating system (TOS) without the loss of data in
your disk. Each side of the disk has an operating system written to it, and this utility
will COPY across your programmes onto a new disk with the now operating system resident.
To run the programme: LOAD *"LOSYS"
Several options are offered in such the same way as the backup programme, responding to
these options, you can work with drive A only or any one of the other three drives. This
utility can be used after FORMAT *(scp) to change default setting on existing disks.
C.3 DUMP
This will allow the chosen file to be dumped onto the screen, giving, the hexadecimal
bytes, for each address, and the ASCII equivalent. Where the ASCII character cannot be
printed it is displayed as a . (dot). The programme will prompt you for the name of the
file you want to dump in this way.
To run the Programme: LOAD *"DUMP"
C.4 LPRINT
This programme will activate your printer connected to the serial channel A to work with
the commands of SPECTRUM BASIC to print text and list a programme: LPRINT and LLIST.
The programme does not use any of the main RAM of the SPECTRUM, but uses the print buffer.
Every time a NEW command is made this programme will be destroyed. To use the programme it
must be first loaded, then run and then line 9, which is the only BASIC line of the
programme, should be erased. The programme should be entered before the main programme you
want to use, however it can be MERGED to the existing programme, provided no line 9
exists. There is a STOP command at the end of line 9 to allow a merge followed by a GO TO
9. The GO TO 9 will activate the printing routine by loading the machine code required.
Once the code is in line 9 is no longer required and should be deleted. The STOP command
will stop entry into the main programme and allow you to break out and delete the line 9.
------------------------------------------------------------------------------
APPENDIX D - RS232C LINK-UPS
------------------------------------------------------------------------------
D.1 PIN OUT OF PLUG
The RS232C sockets are wired as follows:
+++++++++++++++++++++++++++++
+ 1 2 3 4
5 +
+
+
+ 6 7 8 9
+
+++++++++++++++++++++++
1 - N/C (not connected)
2 - TX data (transmit data)
3 - RX data (receive data)
4 - CTS (clear to send)
5 - DTR (data terminal ready)
6 - N/C
7 - Ground (signal ground)
8 - N/C
9 - +12v (Pull-up)
D.2 MAKING a standard 25 pin D-type cable to connect a Printer (available from your
dealer)
FDD SYSTEM---- TO ------- RS232C peripheral connections on
9 Pin D-type 25 Pin D-type
2 ------------------- 3 Rx Data
3 ------------------- 2 Tx Data
4 ------------------- 5 CTS
5 ------------------- 20 DTR
7 ------------------- 7 Signal Gnd.
9 ------------------- 6 DSR (data set ready)
NOTE:You will need to check, your printer configuration (protocol), and match it with that
of the FDD SYSTEM. You can use the default protocol (see chapter 6), and configure your
peripheral to that or you can reconfigure the RS232C port's current setting by using the
FORMAT *"CH_A" instruction.
The most likely need will be to reconfigure the baud rate to match the peripheral.
D.3 PRINTING CHARACTERS
There is a utility programme named 'type' which you will be able to use with your printer,
making it echo the output from the keyboard like a type writer. This is under the
directory named 'UTIL' on your demo disk.
Before loading the program connect a printer equipped with an RS232C interface to channel
A of the controller.
D.4 USING LPRINT and LLIST
You will need the utility programme 'lprint' see appendix C
These can also pass control codes for enlarged Print etc.:
10 OPEN #*1."CH_A";a
20 PRINT *#1;CHR$(27)+'E'
30 CLOSE #*1
D.5 COMMUNICATING : FDD SYSTEM to another SYSTEM
Controller to Controller connection will use a standard TIMEX 9 Pin D type cable, to
connect two FDD SYSTEMS. For any other system using an RS232C interface, follow the pin
out table above, making the connections as shown. The receive programme would need to be
written to suit that system.
To send characters between two systems connect the cable to both channels A of each system
and load RSTRANS (under directory UTIL) into the transmitting computer. The programme
listing is as follows:
Programme: RSTRANS
10 OPEN #*1;":ch_a";o
20 IF INKEY$<>"" THEN GO TO 20
30 IF INKEY$="" THEN GO TO 30
45 PRINT INKEY$;
50 PRINT *#1;INKEY$
60 GO TO 20
The receiver should load RSRECEIV (under the directory UTIL). Listing as follows:
Programme: RSRECEIV
10 OPEN #*1;"CH_A";i;1
20 INPUT *#1;A$;
30 PRINT A$;
40 GO TO 20
The receiver should start running the program before the transmitter.
You will find it easy to send programs from one computer to another. Simply load the
program you want in the transmitting computer and then type:
SAVE *":CH_A" or( SAVE *":CH_B")
Note the use of CH_A or CH_B depends on the Port connections used. In the rest of these
examples CH_A will be used for clarity.
The receiver should type:
LOAD *":CH_A"
All the save and load options are available (see section 3.6)
Using the MOVE * instruction it is possible to send a disk file from one computer to
another using the RS232C (SCP's), linked up.
Example:
sender:
MOVE *"File name" TO ":CH_A"
receiver:
MOVE *":CH_A" TO "file name"
As before the receiver needs to be active first.
------------------------------------------------------------------------------
APPENDIX E - Error trapping
------------------------------------------------------------------------------
The extended BASIC instructions of TOS dealing with the disk drives issue an error report,
where there is one. If these instructions are used within a programme, there is no way of
knowing if they can be executed. For example suppose a sequential file is being accessed
and it is not known where it will end. Any further data output from the file will generate
an error stopping the programme. There are times that this type of error needs to be
'trapped', perhaps warning the user that this has happened, but not having the programme
stop.
The method of carrying out this error trapping in TOS is using two of the unused systems
variables of the SPECTRUM, which are referred to as SYSERR, and TRAP. When the SPECTRUM is
turned on it writes 0 in TRAP and never uses it again. Poking another value into that
location will activate the error trapping mechanism whereby TOS will write an error number
into SYSERR, when one occurs, and a zero when there is not an error.
Testing for the error number and the error condition is the way that error trapping can be
performed. The following example should explain the method more clearly:
50 LET TRAP=23729 :LET SYSERR=23728
100 OPEN #*1;1;"Filename";I
110 POKE TRAP,255
120 INPUT *#1;A$
130 IF PEEK SYSERR<>O THEN GO TO 500
140 PRINT A$
150 GO TO 120
500 PRINT "Reached end of file'
510 CLOSE #*1
Use any 'Filename' that exists under your current directory.
Line 110 error trapping is activated.
Line 130 the error number will appear in SYSERR, or a 0 if no there is not an error. The
error numbers are those that appear in APPENDIX A.
Making use of these errors can be achieved as follows:
500 IF PEEK SYSERR<>72 THEN PRINT "System error number":PRINT PEEK
SYSERR:STOP
510 PRINT "Reached end of file"
520 CLOSE #*1
Note error 72 means an attempt to read past the end of a file, any other error will cause
the programme to STOP.
To disable the error trapping routine remember to POKE 23729,0
------------------------------------------------------------------------------
APPENDIX F - MACHINE CODE TIPS
------------------------------------------------------------------------------
The extended BASIC functions of TOS may be used in machine code programmes, but to do so
calls must be made to the external ROM, that TOS use. The first stage is to understand the
ROM swapping mechanism that is used. All the new commands are in an external ROM that uses
the same address range of the standard BASIC ROM. To access that ROM it must be selected
by jumping to address 0008H. After doing this the external ROM is enabled and the routines
can be used. To avoid crashing the system and not losing control of your programme, it is
suggested that you use the following code to switch ROM's:
PAGEIN PUSH IY ;the ROM uses IY to detect a user call
LD IY,0 ;flag
user call
CALL 8
;paging mechanism activated
POP IY
;restore IY
NOTES:
1 - After executing PAGEIN the external ROM disables interrupts.
2 - You can not use BASIC ROM routines using CBAS. CBAS is explained later
3 - You have access to 1Kbyte of RAM from 2000H to 23FFH that is used by the system to
store variables and buffers. It is free from 2156H to 23FFH.
After using the external ROM you can reselect the BASIC ROM by calling 0603H or 0604H, the
latter does not reenable the interrupts.
In the external ROM there is a routine to call routines in the BASIC ROM with the external
ROM selected, that takes care of all switching. It is called with the address of the BASIC
ROM in the next two bytes. For example:
CBAS EQU 061DH ;the spcial calling routine
CLS EQU OD6BH ;the SPECTRUM routine
CALL CBAS
DEFW CLS ;the calling address low byte first
There is a jump table starting at 0605H with some of the most useful routines in the
externa1 ROM to the machine code programmer. The following is a list of the routines and
the calling addresses:
0605H JP PUTDAT
Purpose :transfer a data
block to the disk system
Registers used:none
INPUT :data to
transfer in bufdat (2000H to 20FFH)
A - number of bytes to send
OUTPUT :none
Comment :can be aborted with
break
0608H JP PUTCOM
Purpose :send command to the
disk system
Registers used:none
INPUT :AF,PC, DE,
HL, IX, IY
OUTPUT :none
Comment :all registers are
sent to the disk system.
Can be aborted with break
060BH JP GETBLOCK
Purpose :get data or command
from the disk system
INPUT :none
OUTPUT :data - carry
reset and data in bufdat
command - carry set and all the registers
changed. Error code in 2100H and
error message in 21ODH to 211DH
Comment :can be aborted with
break
060EH JP SENDBL
Purpose :send a package to
the disk
Registers used:none
INPUT :HL -
buffer pointer
(tvp), (len) - type and length of data to send
OUTPUT :zero if ok.
0611H JP GETBL
Purpose :get a package from
the disk
Registers used:none
INPUT :none
OUTPUT :data in bufdat
or bufcom
zero it op.
(tvp), (Ion) - type and length of data received
0614H JP RDBLOC
Purpose :tread up to 256
bytes from file
Registers used:BC, HL
INPUT :(chan) -
channel number
DE : number of bytes to read
OUTPUT :zero if ok
HL points to bufdat
BC number of bytes read
0617H JP RDMEM
Purpose :read a file to
memory
Registers used:A
INPUT :(prolen) -
number of bytes to read
(prostr) - loading address
(chan) - channel to use
OUTPUT :zero if ok
Comment :Prolen and Prostr
are two byte variables
061AH JP WRTMEM
Purpose :write memory to a
file
Registers used:A
INPUT :(prolen) -
number of bytes to read
(prostr) - loading address
(chan) - channel to use
OUTPUT :zero if ok
061DH JP CBAS
Purpose :Call a BASIC ROM
subroutine
INPUT :address to
call
Comment :all registers are
preserved during the ROM switching
0620H JP SAVEP
Purpose :save code or a
Program to a file
Registers used:none
INPUT :Pathname
in bufdat (must end with CHR$(0))
A' - len of Pathname
BC - len of code to save
DE - code start
HL - line number it there is one
OUTPUT :zero if ok
To study the extended BASIC ROM you can use this programme:
COPY PUSH IY
LD IY,0
CALL 0008H
POP IY ;the
Paging routing
LD BC,1000H ;the ROM only has 4Kbytes
LD HL,OOOOH
LD HL,DEST ;Place in, memory where code
to be put
LDIR
CALL 0603H ;select the BASIC ROM
RET
;return
To send a command to the disk system you must place the command in 2100H set the Z80
registers with correct parameters and call PUTCOM. The disk tries to execute the command
and sends back the result and error report (0 if 0,K). To get the result you can use
GETBLOCK which returns with the carry set if the disk. sent a command or reset if it was
data.
Montagem e impressăo:
GRÁFICA P. CACILHAS, LDA.
ALMADA - PORTUGAL